
Wix Studio Social Bar Color Not Changing? Here is the Fix!
If you’ve ever tried to change the color of a Social Bar in Wix Studio to match your brand’s palette—like a specific cream or a soft gold—you probably noticed a problem. When you click on the icons, the only option is to replace the image.
This is because the default Wix Social Bar uses raster images (pixels) rather than vector shapes. Since they are images, you are stuck with the preset colors (usually black, white, or brand colors).
Here is a simple workaround to create a fully customizable, branded social bar using SVGs and the “Stack” feature.
Short on time? Watch the fix in this 7-minute video below.
Wix Studio: Fix Social Icon Colors Step-by-Step Tutorial
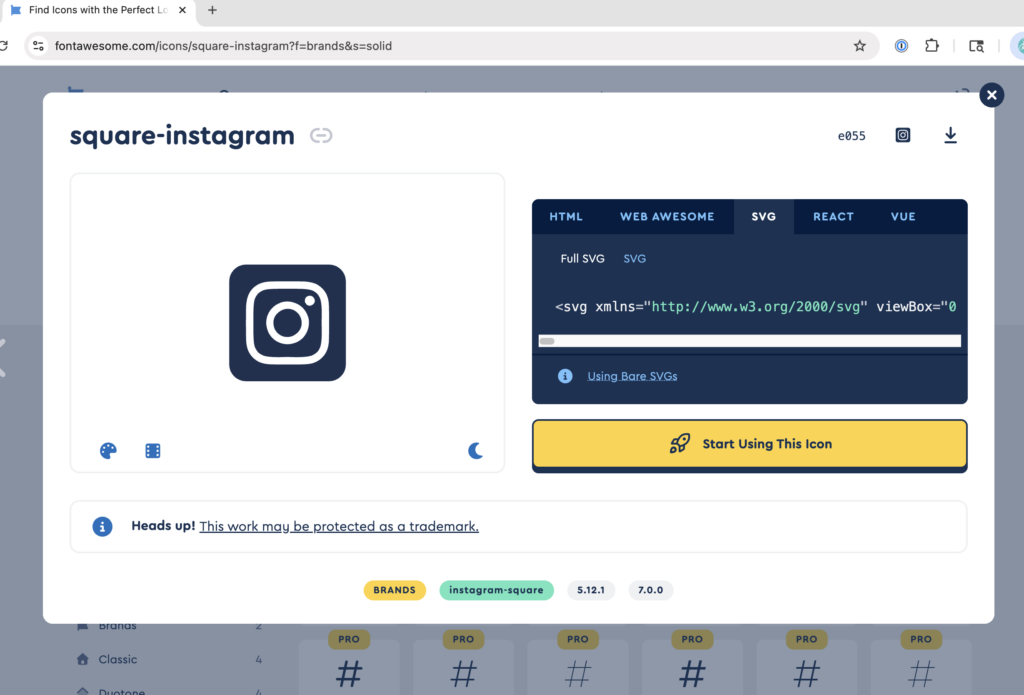
Step 1: Source Your Vector Icons
To change the color of an icon in Wix Studio, it must be a Vector Shape.
- Go to a site like Font Awesome.
- Search for your social media platforms (e.g., Instagram, Facebook, X).
- Select a consistent style (e.g., all “Square” or all “Circle”).
- Download the SVG file for each icon.
Unlimited Options: Why Custom Icons Win
One of the biggest limitations of the default Wix Studio Social Bar isn’t just the color—it’s the selection.
While Wix provides the heavy hitters like Instagram, Facebook, and X, many businesses need specific platforms that aren’t in the default library. By using the SVG Shape method, you aren’t restricted to a preset list. You can add:
- Houzz for interior designers and contractors.
- TripAdvisor for hospitality and travel brands.
- Trustpilot or Yelp for service-based businesses.
- GitHub or Behance for creative portfolios.
If a platform exists, they likely have a “Brand Assets” page where you can download their official logo as an SVG. This ensures your client’s footer is 100% complete and professional, without any “missing” links.
Step 2: Add Icons as Shapes
Instead of using the “Social Bar” element, we are going to build our own using the Quick Add menu.
- In the Wix Studio Editor, go to the Plus (+) icon (Quick Add).
- Select Shape.
- Click Change Basic Shape and upload your downloaded SVG files from your computer.
- Once uploaded, select your icon and click Add to Page.
Step 3: Customize the Color and Link
Because you uploaded these as SVGs, Wix Studio treats them as vector shapes.
- Color: Click on the icon, go to the Inspector panel, and select Fill Color. You can now choose any color from your site theme or add a custom hex code.
- Linking: Click the Link icon in the element settings and paste the URL to your social profile.
Pro Tip: Once you have one icon styled perfectly, Duplicate it. Then, simply use “Change Basic Shape” for the duplicate. This keeps your color and size settings consistent without extra work!
Step 4: Grouping with the “Stack” Feature
To make your custom icons behave like a real social bar, you need them to be grouped and spaced evenly.
- Select all your icons by Shift-clicking each one.
- Click the Stack button that appears in the floating menu.
- In the Inspector panel, you can set the Stack to Horizontal.
- Adjust the Item Spacing (e.g., 10px) to ensure the gaps between icons are perfectly uniform.
Step 5: Final Alignment
With your icons in a Stack, you can now align the entire group to the center, left, or right of your footer. If you need to change the order of the icons, simply drag them within the stack, or use the Layers panel to reorder them.
By using SVGs instead of the default image-based icons, you gain total creative control over your footer’s aesthetic. Happy designing!
Frequently Asked Questions
If you want to use the default Wix social icons, you can find them in the main menu.
1) Open the Add Panel: Click the Add Elements (+) icon on the left-hand side.
2) Locate Social: Select the Embed & Social category.
3) Pick a Bar: Click on Social Bars and browse the available styles.
4) Place it: Simply drag your chosen bar onto your page (like your footer or header).
Note: Keep in mind that these default bars use image files, which is why their colors cannot be changed via the “Fill” settings.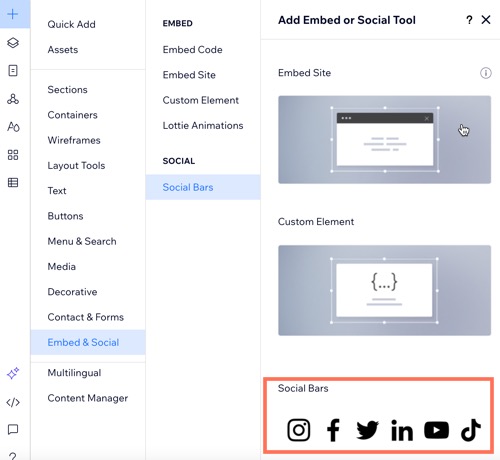
The default social bars in Wix Studio are made of raster images (like PNGs), which have “baked-in” colors. To change an icon to a custom brand color, you must use a Vector Shape (SVG). As shown in the video above, uploading an SVG allows the Wix Studio Inspector to treat the icon as a shape with a customizable “Fill Color.”
I recommend using Font Awesome or The Noun Project.
When downloading icons for Wix Studio:
Ensure you select the SVG format.
Download a consistent set (e.g., all “Solid” or all “Thin” styles) so your bar looks professional.
The best way to keep your custom icons organized is to use the Stack tool. By selecting all your individual icon shapes and “stacking” them, you can control the exact pixels of space between them. When you switch to the mobile breakpoint, you can easily change the stack from horizontal to vertical if needed!
Yes! Just like the default element, you can add a link to each individual shape. Simply click the Link icon in the element settings and paste your social media URL. These clicks will still show up in your site analytics.
This is exactly why the custom SVG method is superior! Instead of waiting for Wix to update their library, you can download the official SVG logo from the platform’s own website and upload it as a Shape in Wix Studio. This allows you to maintain a consistent color and style across every single social link, no matter how niche the platform is.
Struggling with a complex Wix Studio build? Book a 1-on-1 consultation and let’s solve it together.
Want more Wix Studio tips? Browse my full collection of tutorials here: Wix Studio Tag Feed