
When you pivot from designing static assets to editing video assets, you quickly run into a fundamental digital hurdle: uncoupling (or detaching) an audio track from a video clip so you can delete it.
Maybe you are layering an instrumental track over a piece of b-roll, or perhaps your camera’s microphone picked up background static you don’t need. While Adobe Premiere Pro and Descript both accomplish this goal perfectly, they handle their timelines completely differently.
To truly master your post-production stack and choose the right tool or combination of tools for your project, you have to understand the code and workflow logic driving both platforms. Here is exactly how they handle track separation differently.
1. The Traditional Grid: Adobe Premiere Pro

Adobe Premiere Pro is built as a classic track-based timeline editor. When you import a clip, Premiere behaves like a vector design program; it locks your video layout track (V1) and its corresponding audio track (A1) into a single grouped asset so your elements do not accidentally drift out of chronological sync.
Because they are grouped, selecting the audio track and hitting delete will instantly clear your video track as well. To fix this, you must explicitly tell the program to ungroup the data by choosing Unlink.
How to detach and delete audio in Premiere Pro:
- Select your linked clip: Timeline Panel.
Locate the target clip on your active timeline track layout where the video and audio paths are synchronized. - Unlink the media tracks: Right-Click Menu.
Right-click on either the video or audio on the timeline and choose Unlink from the context window (or use the shortcutCmd + Lon Mac /Ctrl + Lon Windows). - Clear the audio layer: Timeline Cleanup.
Click on a blank area of your timeline canvas to reset your active selection. Select only the independent audio track layer and press Delete or Backspace. You can also right-click and select the Cut command.
💡 The Designer Translation: Think of Premiere Pro like Adobe Illustrator. When you group a text container and an image, they move as a single object. To manipulate one without touching the other, you can use the Ungroup command (Cmd + Shift + G). Unlinking tracks in Premiere is pretty much the same concept.
The Transcript-First Mindset: Descript
Descript handles video entirely differently because it’s built around your transcript first. Think of it more like editing a Word doc or a blog post rather than playing with a loose timeline. Because every single frame of your video is locked to a spoken word in the text, you can’t just casually slice and throw tracks around.
When you detach the audio here, Descript doesn’t just drop a loose track onto your timeline. Instead, it creates what’s called a Sequence, essentially a protective container that holds the video and audio layers together so your transcript text doesn’t break. Because it groups them this way, you have to take an extra step and actually open that container to remove the audio track.
How to detach and delete audio in Descript:
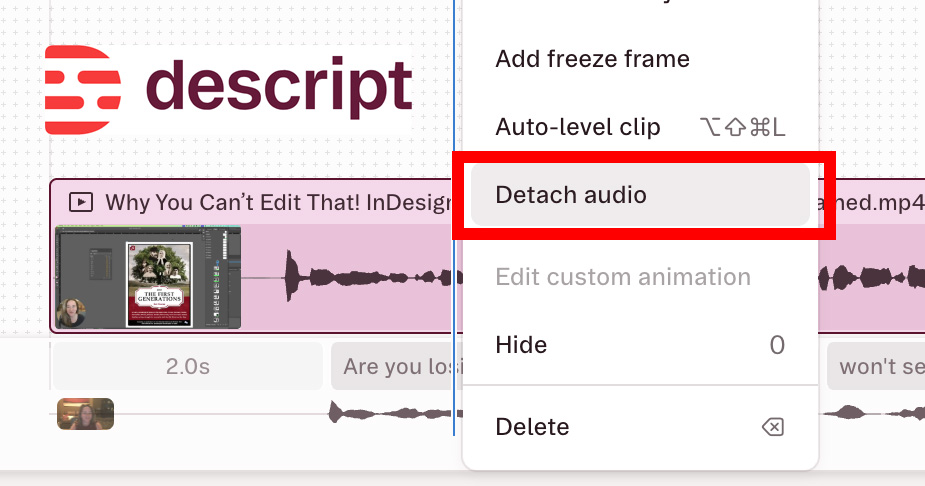
- Select the audio waveforms: Timeline View.
Navigate down to your timeline visualizer, select the audio waveform profile of the clip, and right-click. - Detach the source audio: Right-Click Menu.
Select Detach audio. Descript will automatically isolate your clip and wrap it into a nested sequence containing two independent component layers: your video and your audio. - Step inside the sequence view: Sequence Editor.
Right-click the newly bundled sequence container on your timeline and select Edit sequence. This shifts your view past the text transcript and down into the structural media tracks. - Remove the audio file: Multiple Layers
Inside the sequence isolation mode, select the standalone audio layer clip, and click Delete on your keyboard.
💻 The Developer Translation: Descript treats assets like a nested object-oriented architecture or a React component framework. Clicking “Edit Sequence” is equivalent to stepping inside a custom child component container (<Sequence>) to modify the inner code nodes (<video> and <audio>) without breaking the parent wrapper rendering the main webpage transcript.
The Verdict: How to Choose Your Tool
At the end of the day, picking between these two comes down to what drives your project.
If your video is entirely about a person talking (like a vlog, an interview, a podcast, or a quick social media short), Descript is incredibly fast. It lets you chop out filler words in seconds, even if deleting a background track forces you to jump through that extra sequence step.
But if you are building something where the visuals take the lead, such as a highly styled promo video, a b-roll heavy design reel, or a project with a complex music score, stick with Premiere Pro. It gives you the raw, track-based freedom to unlink, slice, and delete whatever you want without any structural friction.