
Ensuring you send your company’s email marketing to the right customers and that your customer data is in the right field is critical to campaign success. Here are some tips I implement.
Discounts for Hospitality and Lodging Email Blasts
One of my essential tips for the lodging/hotel industry is NOT to send upcoming discount promotions to guests already booked with you. This causes guests to feel slighted and ask for the discount directly or to cancel and rebook, incurring additional credit card fees for the company.
Scenario: Filter out guests who are already booked in Excel
Step 1.
Let’s take the scenario of a small bed and breakfast; before I send out an email with a discount promo code, I download the most recent customer list from their booking software (in this case, ThinkReservations). I download the file as a CSV file.
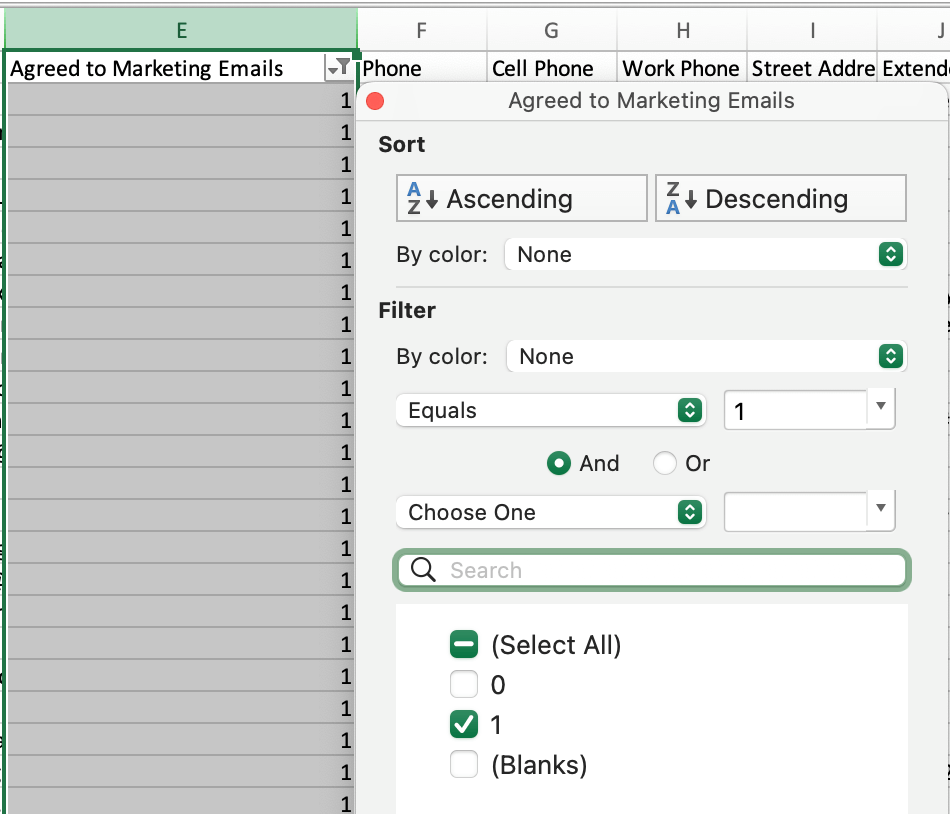
Next, I sort the list by the “Agreed to Marketing Emails” column. This type of consent is typically a 1 (yes) or 0 (no) in your list.
Step 2.
Next, I copy and paste all the names and contact information of guests with a Yes to Marketing Emails into a new .CSV file for upload into our email marketing software. Don’t forget to save and export as a CSV file and not an XLS file (the default).
Step 3.
For this client, we use MailChimp. I upload my CSV file at this point because I want all new customers to be part of the MailChimp database. I’ll filter by already booked guests in later steps.
So, in MailChimp, I select Audiences from the left navigation. From the top Audience navigation, I choose Manage Audience > Import Contacts from the Add Contacts drop-down.

I follow the List Import prompts to import from the list and organize and sync the columns in my list with the database in MailChimp. I always check “Update any existing contacts” during import.

Step 4.
Next, I go back to the new CSV file, and this time I sort by a column called “Last Check-In.” This puts my customer list in order of future reservations.

For this particular eblast, I’m sending a promotion for March, April, and May, so I want to remove guests already booked for those three months for the eblast send. I’m creating an exclusion list.
Now that my list is sorted, I will copy the rows of guests with upcoming March, April, May, and even June bookings to my computer clipboard.
Step 5: Create MailChimp Segment via Tags
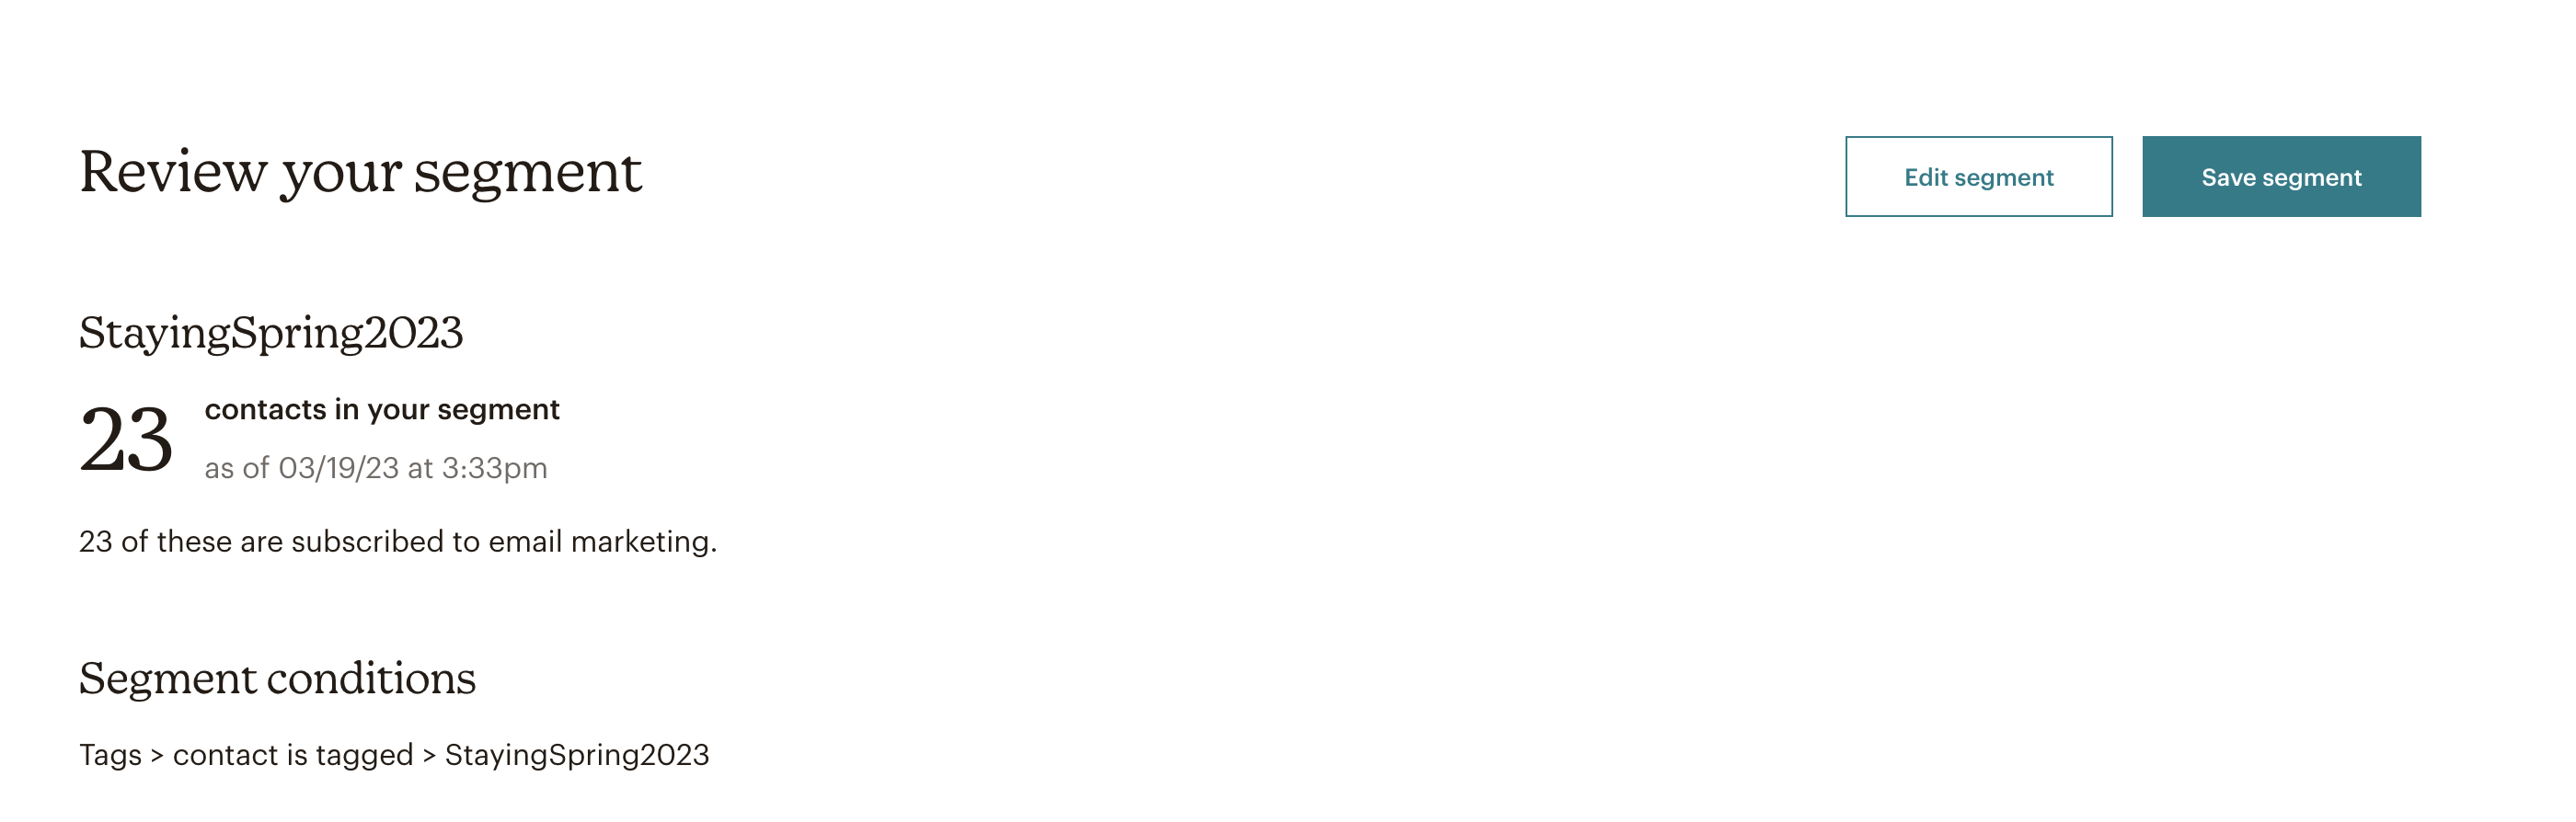
I’ll go back to MailChimp and Import Contact, this time choosing Copy and Paste. I copy just the email column, as it will sync with the customer list by just email. Don’t forget to check the box for “Update Current Subscribers,” otherwise this step won’t work. I’ll follow the organization prompts, but this time add a Tag, such as “StayingSpring2023.”
Step 6.
Now I’ll return to Audience > Segments and create a new Segment based on “StayingSpring2023.” I use the logic of anyone in the audience tagged with “StayingSpring2023” to become part of the new Segment.
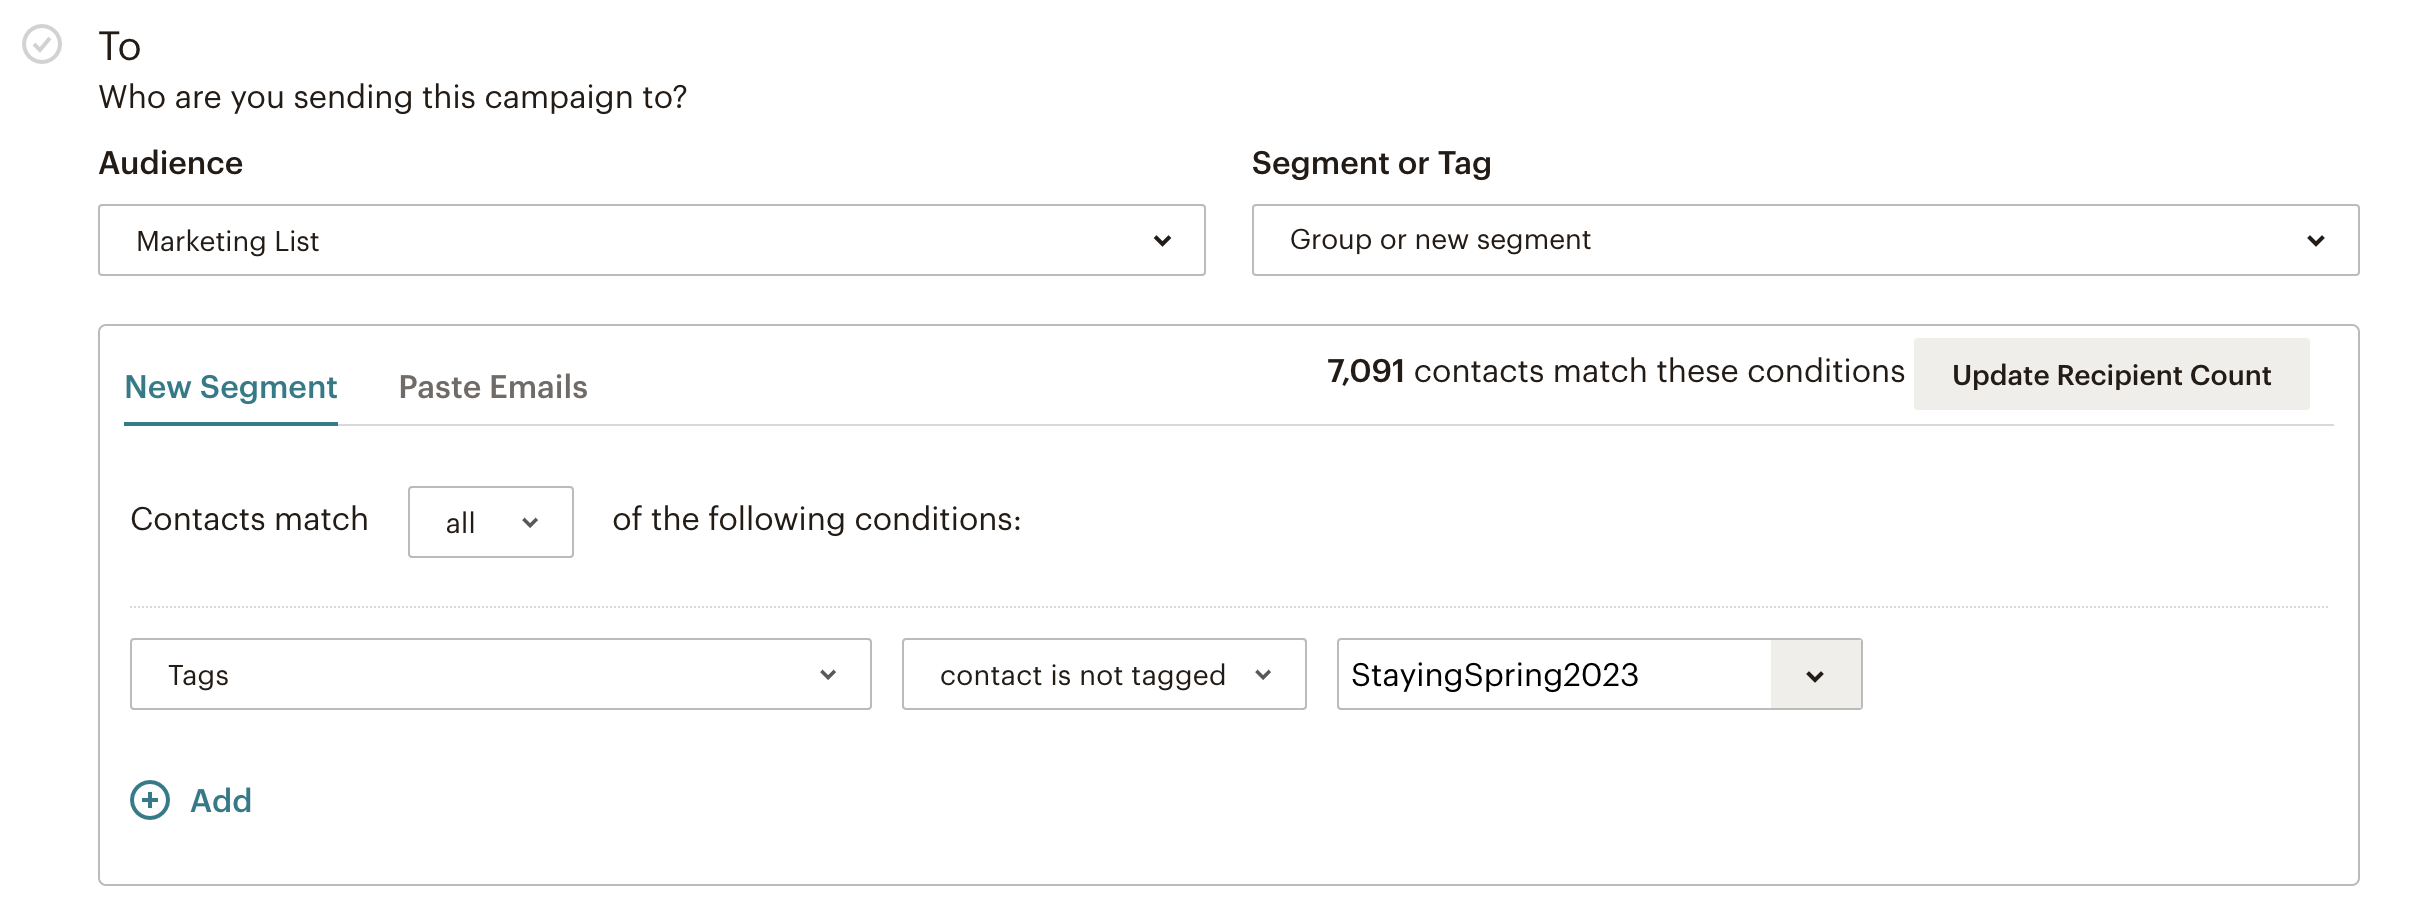
The final step is to go to my new email campaign and adjust my send-to audience. I change the email’s audience to everyone on my list EXCEPT those customers in the segment “StayingSpring2023.” I do this by choosing Tags > Contact is not tagged > StayingSpring2023.
And that’s it. That’s how I send a targeted discount email to only my email list not already booked. This is critical when I’m sending a future lodging discount as I don’t want guests already booked at full price to be directly emailed about booking at a discounted price.
Use Excel to combine first name and last name fields into single name field
A simple formula that saves so much time in Excel is how to easily combine the content in a cell from one column with the content in another cell separated with a space. This is especially helpful if you’re combining a First Name column with a Last Name column to form a Full Name column in user database.

The SUM formula is =A2&" "&B2 or whatever cell makes sense in your database. The important part is that you use the ampersand and add a space with " " between the first and last name.
Watch Video: Excel Tip: Combine First Name and Last Name columns into a single Full Name Column
The opposite: Covert a Full Name Column into a First Name and Last Name Column in Excel
The technique I use is to Convert Text to Columns with the Space delimiter. A great resource is found here.
Capitalize your First Name or Last Name column in Excel
This Excel script is used in a blank column directly beside your name column that you want to make sure it is capitalized. Change the C2s in the script below to meet your needs.
=REPLACE(C2,1,1,UPPER(LEFT(C2,1)))I hope sharing my customer export and MailChimp syncing process is helpful in your email marketing efforts.