
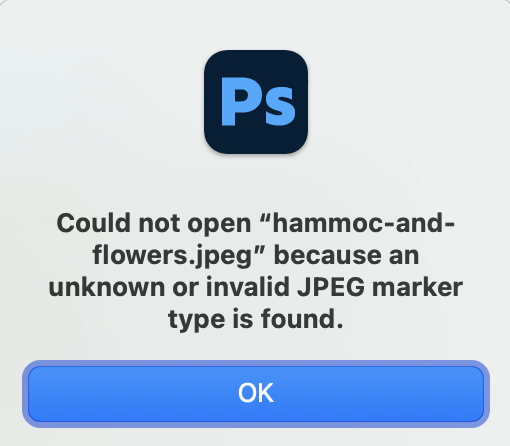
If you’ve ever tried to open a JPEG on your Mac and Photoshop threw the error “unknown or invalid JPEG marker type,” you’re not alone. This is a common issue, especially with images taken on an iPhone. The good news is that the fix is quick, simple, and something you can do right in Finder or Preview.
Below is the video walkthrough, followed by the full video transcript and written steps.
Watch the Video
Why Photoshop Can’t Open Some JPEGs: HEIC
If you can preview the image in Finder but Photoshop refuses to open it, the file is probably mislabeled. iPhones often save photos as HEIC files. When a HEIC is renamed with a .jpeg extension, Photoshop reads the metadata, gets confused, and flags the file as invalid.
Fortunately, there are two straightforward fixes for changing files one-by-one (renaming and reexporting) and several solutions for automating the process to fix images in bulk.
Fix 1: Rename the File Extension
- Select the image in Finder.
- Press the spacebar to confirm that the preview displays correctly.
- Click the filename and change .jpeg to .heic.
- The preview will update, and you should now be able to open the file in Preview or Photoshop.
This works because the metadata is intact. The file was mislabeled.
Fix 2: Re-export the Image Using Preview
If renaming doesn’t solve it, open the file in the Preview app.
- Right-click the file and choose Open With > Preview.
- Go to File > Export.
- Save the file as either an HEIC or a fresh JPEG.
Preview correctly rewrites the metadata so that Photoshop opens the new file without errors.
That’s It
Both methods work because they fix the mismatch between the file type and the metadata. If Photoshop keeps complaining about an “unknown or invalid marker,” it usually means it’s not a real JPEG at all. A quick rename or re-export will bring it back to life.
What to Do for Hundreds or Thousands of Images with this Error (Automated Image Conversion Solutions on Mac)
Manually changing the file extensions or exporting them one by one through Preview is not practical for dozens, hundreds, or even thousands of images. In this scenario, you need to use an automated batch solution. Macs have many built-in tools that can handle bulk image conversions.
Option 1: Batch Rename Extensions using Finder (Change extensions to the true file type, HEIC)
You can rename multiple files’ extensions from .jpg or .jpeg to .heic in bulk and natively in Mac’s Finder.
- Open the folder containing the images.
- Press
Cmd + Ato select all files (or select them in large batches). - Right-click and choose Rename…
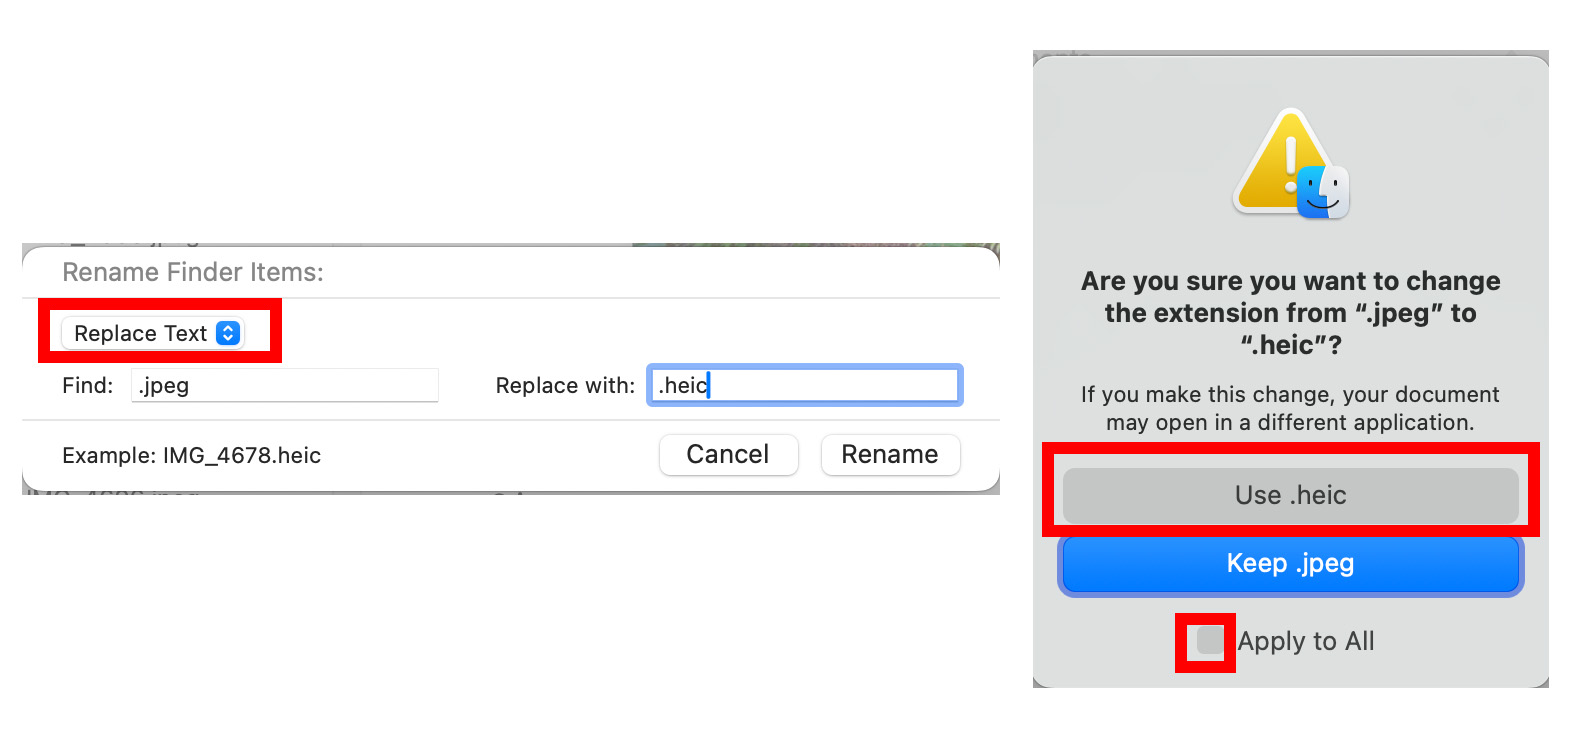
- In the modal window’s drop-down menu, choose Replace Text.
- In the Find field, put:
jpg(orjpeg) - In the Replace field, put:
heic - Click Rename. A pop-up will appear asking if you want to change the extension from .jpeg to .heic. Check the “Apply to All” box, then click Use HEIC. MacOS will update the extensions of all selected files instantly, and you will now be able to open your files in Photoshop.
Option 2: Use the Native macOS “Automator” App (To Convert the mislabeled HEICS to actual JPEGs)
If you actually want the image files to be true JPEG files for your workflow, you can create a quick Automator script to batch-convert them using the Mac’s native processing engine:
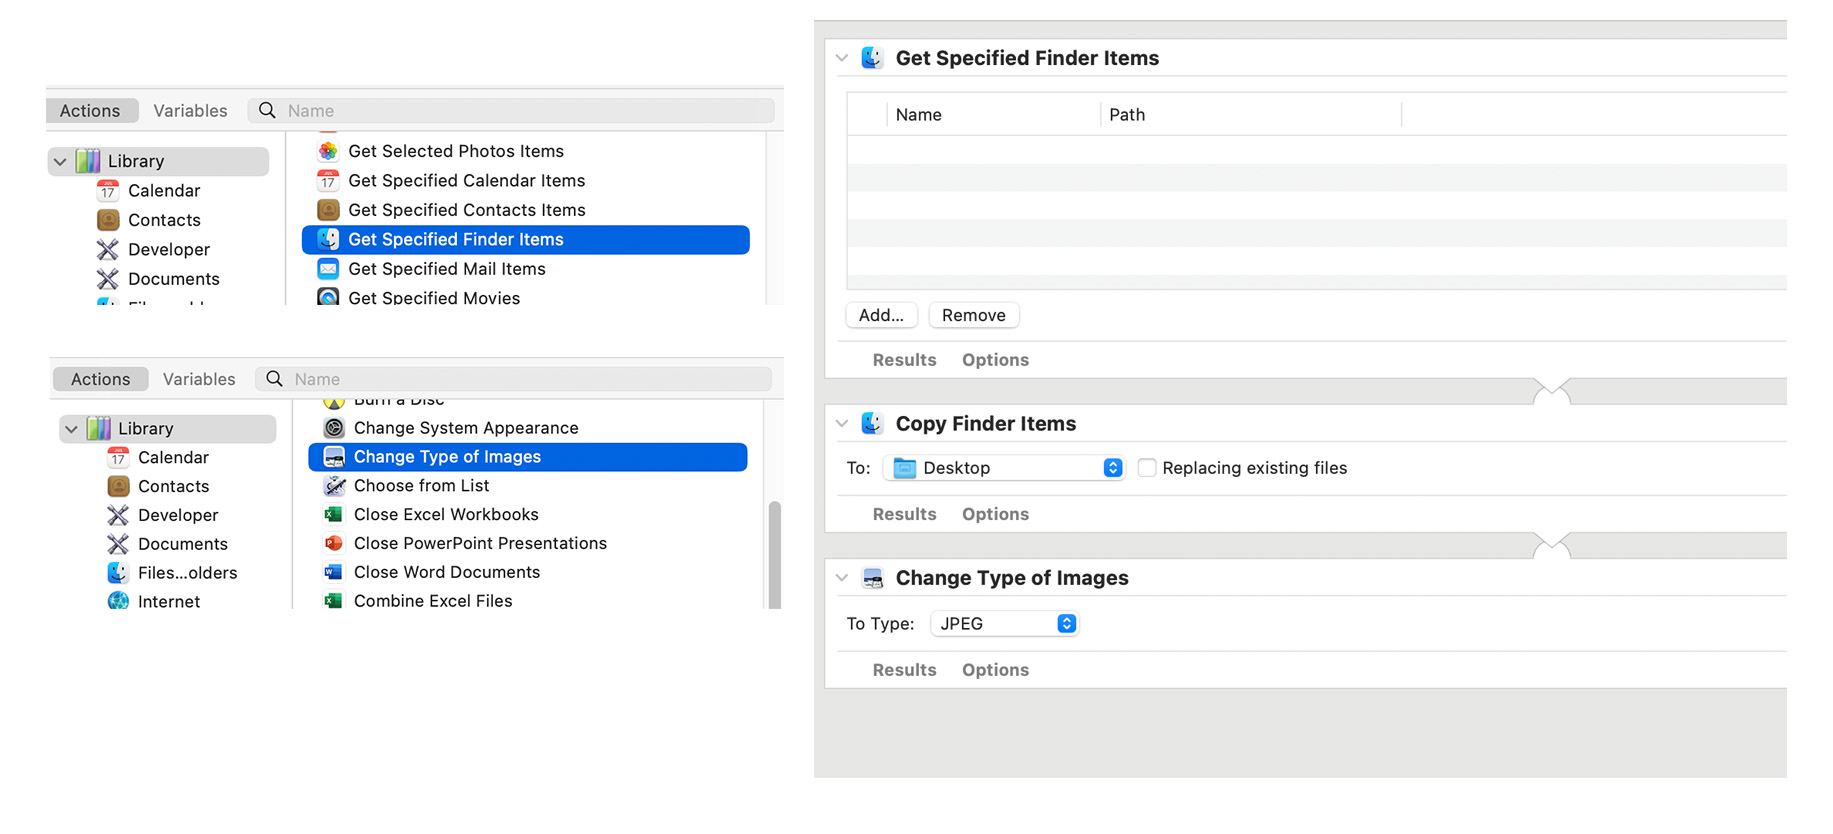
- Open Automator (found in Applications) and choose New > Workflow.
- In the actions sidebar, search for and drag Get Specified Finder Items (or Ask for Finder Items) to the right panel.
- Search for and drag Change Type of Images to the panel. (Automator will ask if you want to add a “Copy Finder Items” action to preserve originals—it is highly recommended to click Add so they don’t overwrite the original files). In this box, create a new folder or navigate to the folder where you want the newly created images to live.
- In the Change Type of Images action, set the drop-down to JPEG.
- Drag and drop the massive folder of images into the Get Specified Finder Items box and hit Run in the top right corner. macOS will process the conversion in the background.
Option 3: Adobe Bridge (Batch Rename or Export in Adobe)
Since you are already using Photoshop, you likely have access to Adobe Bridge (included in the Creative Cloud subscription):
- To Bulk Rename: Open your folder of images with errors in Adobe Bridge, select all files, go to Tools > Batch Rename, and change the string extension to
.heic. - To Bulk Convert: Alternatively, you can use the Workflow panel in Bridge to set up a batch export that forces a re-conversion into standard JPEGs, which will rewrite the correct markers.
Frequently Asked Questions about HEIC and JPG/JPEG Errors
If you download images from a cloud service (like Google Drive, OneDrive, or Dropbox) or back up images from an iPhone to a computer via a third-party app, the transfer software likely caused the issue.
- Many backup tools are coded to automatically rename files
.jpgso that the images are universally compatible with older computers and devices. However, in many cases, the software renames the label without actually converting the data inside. So, it may dump thousands of Apple HEIC photos onto the computer, forcing an.jpgextension onto them. - Another issue might be a direct Airdrop or a mismatch with the transfer cable. When transferring files directly from an iPhone to a Mac via AirDrop or a USB cable, Apple has a setting under Settings > Photos > Transfer to Mac or PC. If it is set to “Keep Originals,” the iPhone sends raw HEIC files. Sometimes, if a third-party file transfer program (like an old Android/Windows-to-Mac bridging app) intercepts that transfer, it might forcefully tag them as
.jpgduring the import process because it doesn’t fully understand the newer HEIC container.