How to create a Color Wheel

H

Color is fascinating. Learn to make Color Wheels with the videos below. I also think you’ll love this Color Game by Method of Action where you hone your color skills by selecting hues, saturations, complementary colors, analogous colors, triadic colors, and tetradic colors.

Make a Scientific Color Wheel in Illustrator

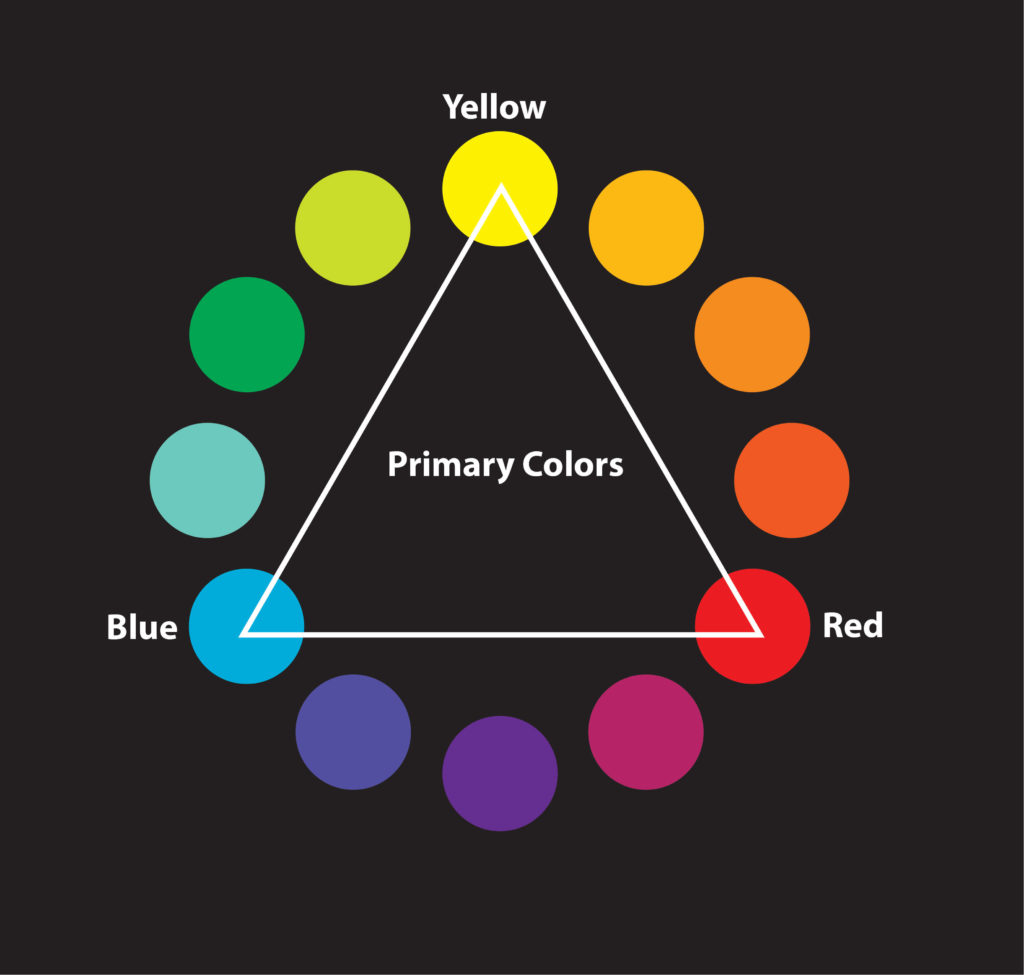
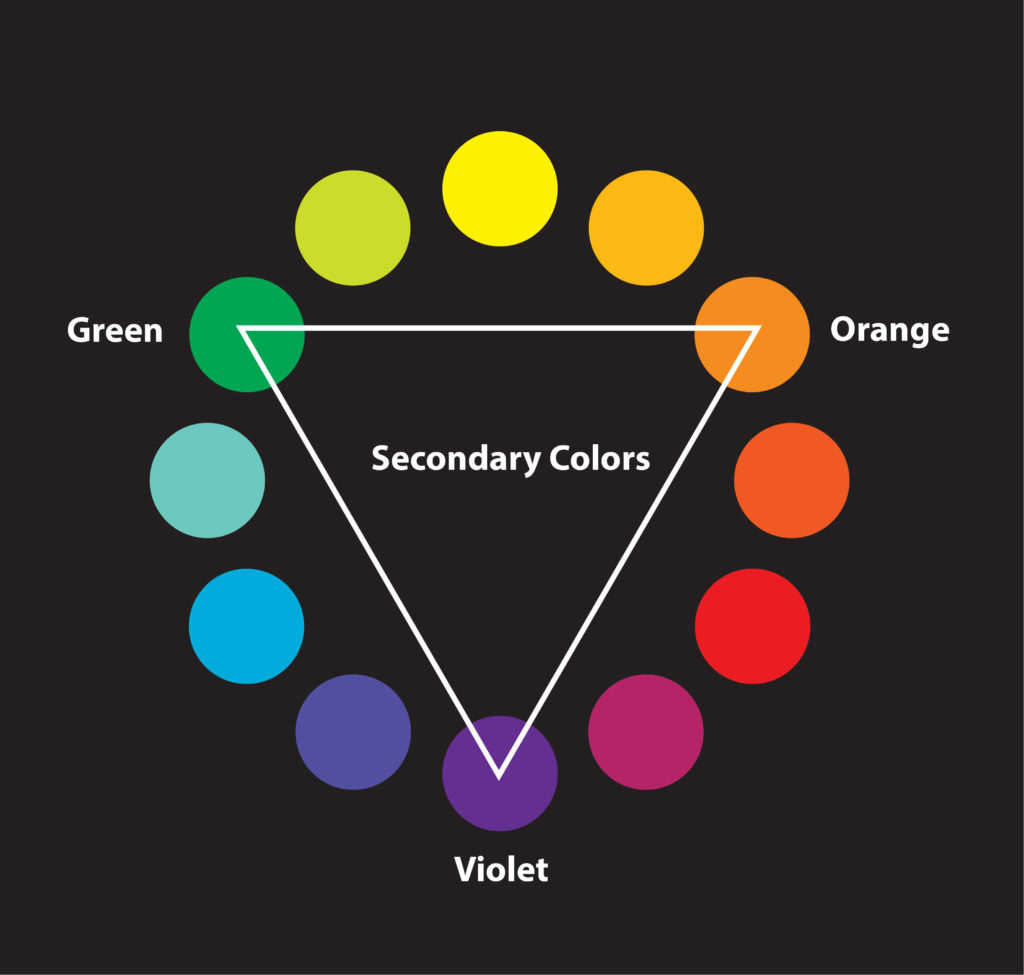
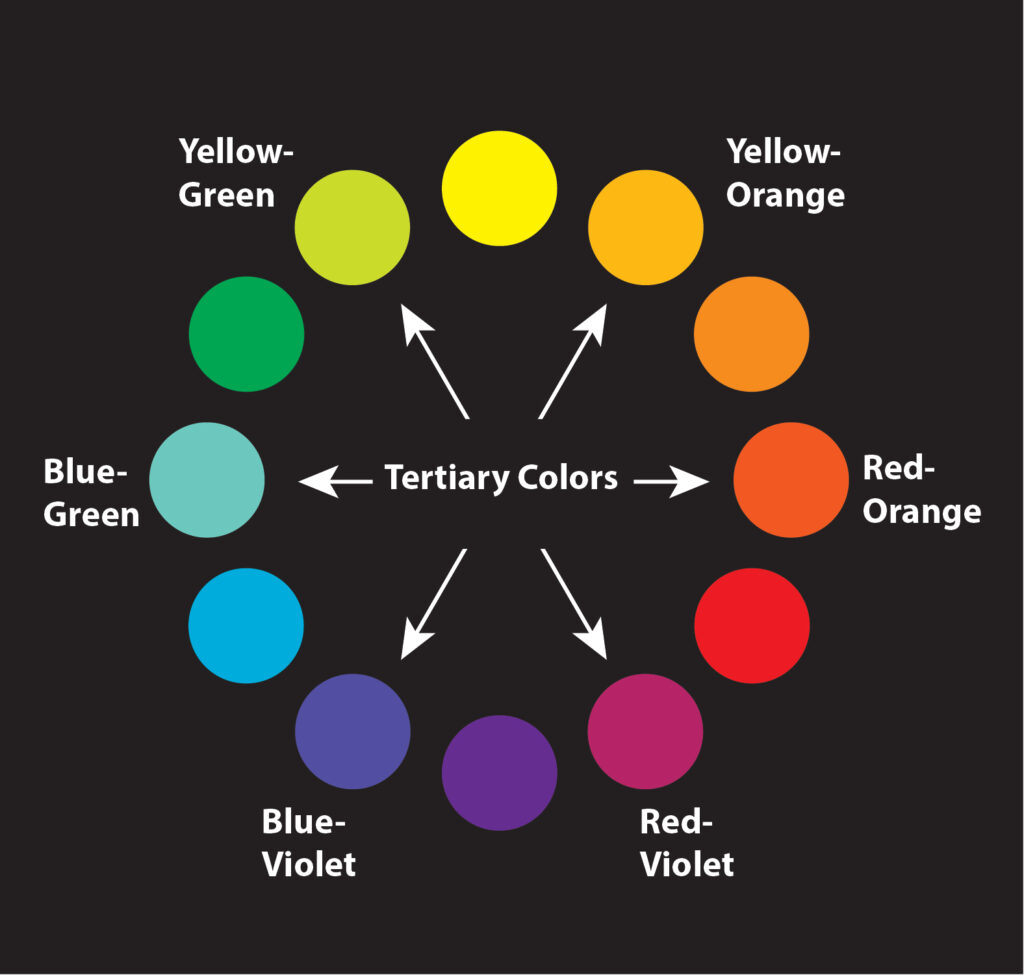
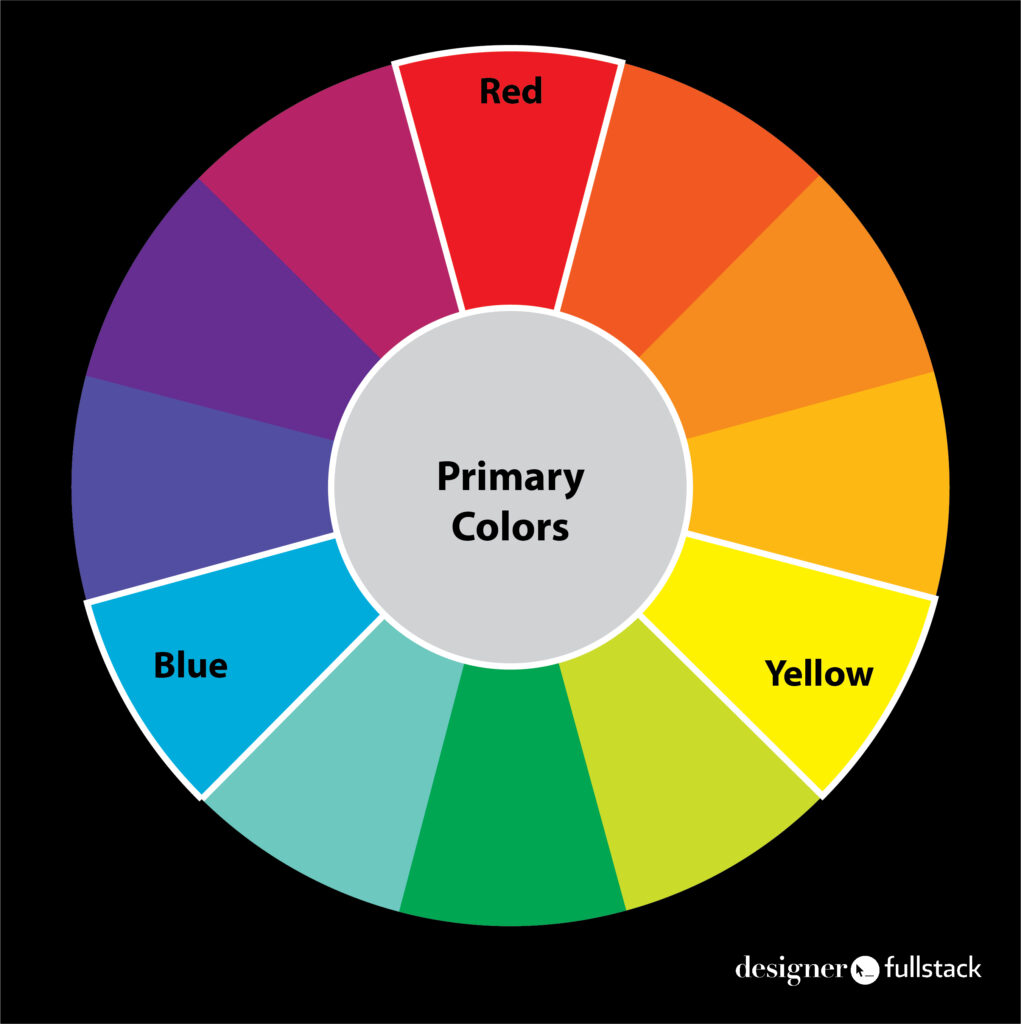
The scientific color wheel aligns 12 colors so that you can see their relationships. The three primary colors (red, blue, and yellow) form a triangle, as do the secondary colors (orange, violet, and green). Colors that form a triangle are called Triadic colors and make Triadic color schemes.

Primary Colors
Primary Colors (Triadic)
Secondary Colors
Secondary Colors (Triadic)

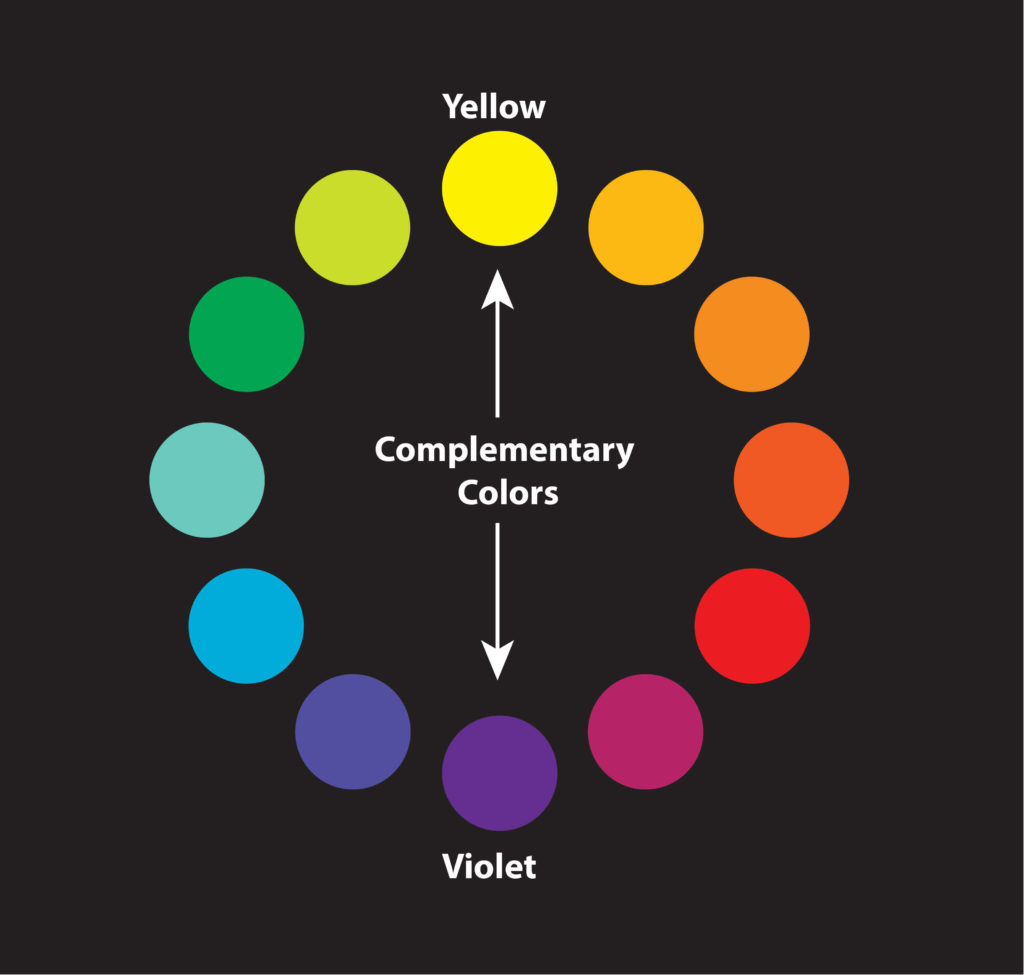
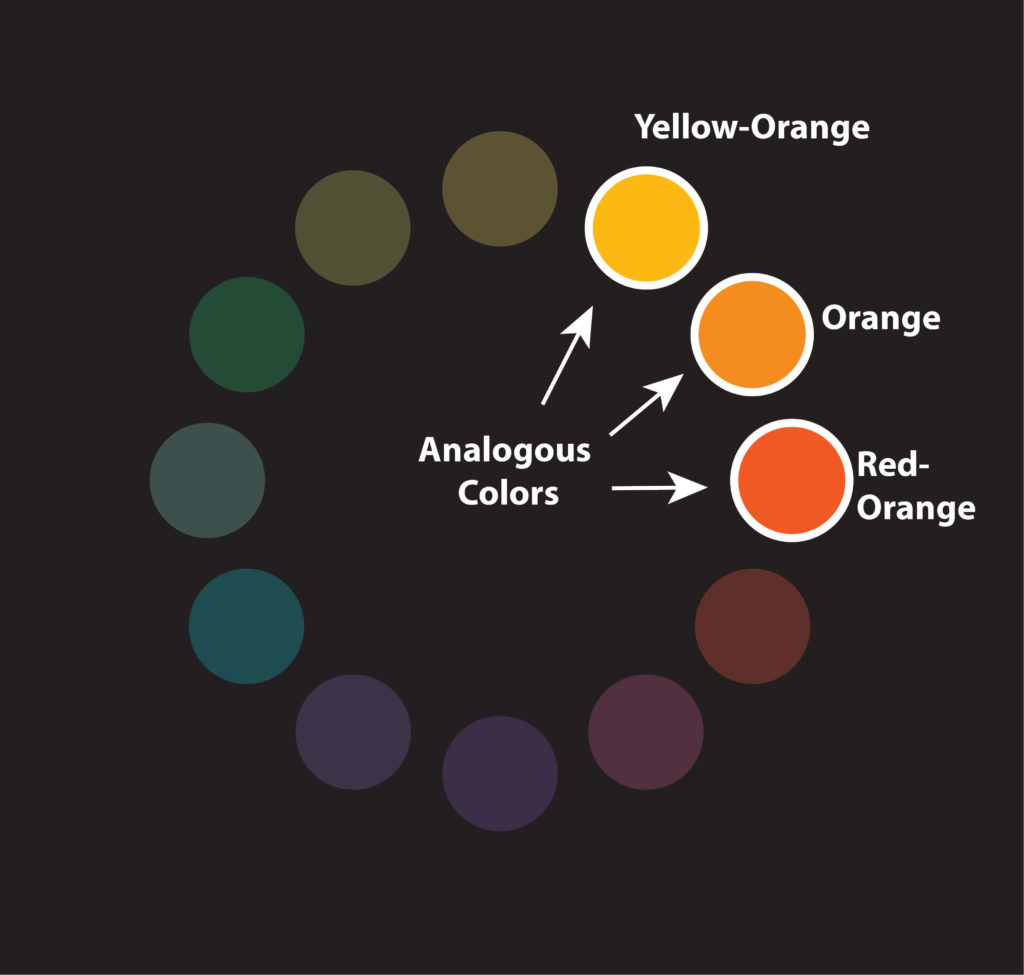
Colors that are opposite each other are known as complementary colors. There are six sets of complementary colors in the scientific color wheel. In addition, the three colors next to each other are known as analogous colors. There are twelve combinations of analogous colors.

Complementary Colors
Analogous Colors

Make a HSB Color Wheel in Illustrator

This is a How-To video I use when introducing beginner undergraduate Graphic Design and Public Relations students to Color Theory. It uses the HSB color mode and Live Paint Bucket tool in Adobe Illustrator.

For beginners, here’s an easy way to make a color wheel in Illustrator.

Make an RGB Color Wheel (Triangle) in PhotoShop

This is an additive color exercise that uses the RGB color mode and brush tool in Adobe Photoshop.

Read our video transcripts to find the exact time stamp for what you’re looking for:

00:00:00.000 –> 00:00:04.480
For this video, we’re going to use
Illustrator. And, we are going to work on an

00:00:04.480 –> 00:00:10.880
HSB color wheel. “H” standing for Hue. “S”
for Saturation. And “B” for Brightness.

00:00:11.680 –> 00:00:16.400
So, I’m going to create a new file.

00:00:16.400 –> 00:00:22.480
I’m going to make it eight inches by eight
inches with an RGB color mode and say, “Create.”

00:00:24.400 –> 00:00:29.200
All right, so first, we’re going to zoom out
(which is Command + minus sign). We’re going

00:00:29.200 –> 00:00:34.560
to come into our Rectangle Tool where we can also
find our Ellipse and we’re going to make a circle.

00:00:34.560 –> 00:00:37.040
So, we’re going to start
by making the color wheel.

00:00:38.000 –> 00:00:47.760
I’m going to click once and select 7 by 7 inches.
You can tab through your fields. Say “ok.” This

00:00:47.760 –> 00:00:53.600
way it can be centered in our artboard.
So to center, we can use the Align window.

00:00:54.240 –> 00:00:58.720
You can see you have the option “Align to
artboard” and you’re going to do a Horizontal

00:00:58.720 –> 00:01:04.880
Align Center and a Vertical Align Center. All
right, next, we’re going to break our circle

00:01:05.520 –> 00:01:07.680
into 12 even pieces.

00:01:08.400 –> 00:01:13.840
We’re going to do that with a line. I’m going
to click and drag the holding-down shift on my

00:01:13.840 –> 00:01:18.960
keyboard to make sure it’s centered or straight.
And now I’m going to work with centering.

00:01:20.400 –> 00:01:25.840
So, I can use my Black Select Arrow click and
drag to select both the circle and the line,

00:01:26.560 –> 00:01:30.880
and again I’m going to do Align Objects and
the Artboard, so they’re perfectly centered.

00:01:32.160 –> 00:01:38.240
All right, now I’m going to select just the line
and we’re going to use Object > Transform. And,

00:01:38.240 –> 00:01:46.480
we’re going to Rotate. So, 360 is divided by 12.
We’re going to do 30-degree increments in the

00:01:46.480 –> 00:01:51.040
Rotate pop-up window. I’m going to use “Copy”
which is going to make a duplicate of the line

00:01:51.040 –> 00:01:57.520
leaving the first line where it is. You can click
On and Off Preview to see what your settings do.

00:01:57.520 –> 00:02:06.400
So, I’m going to click “Copy.” You can see I have
two lines now. So, now I could say Transform

00:02:06.400 –> 00:02:13.520
Rotate and do it again and click “Copy” or I
can do the shortcut of Transform Again, which is

00:02:13.520 –> 00:02:22.000
Command + D as well. So I can now push Command

  • D and I now have all of my lines in place.

00:02:22.000 –> 00:02:27.600
So, next what we’re going to do is we are going
to Divide and we’re going to turn it into Live

00:02:27.600 –> 00:02:33.360
Paint so that we can put colors into these pie
slices. So, I’m clicking and dragging across

00:02:34.400 –> 00:02:36.000
and pulling up my Pathfinder Window,

00:02:36.000 –> 00:02:40.000
which if it isn’t there it’s under Window
> Pathfinder. Look for the checkmark.

00:02:41.040 –> 00:02:43.200
And I’m going to use the Divide Tool.

00:02:44.640 –> 00:02:48.560
All right, so now it gets rid of all the
lines on the outside and I have these spaces

00:02:49.200 –> 00:02:56.400
I’m going to use the Live Paint Bucket. It’s under
that Shape Builder Tool. For this whole shape,

00:02:57.600 –> 00:03:03.120
I’m going to need to have it selected. I’m
going to grab my Live Paint and when I hold

00:03:03.120 –> 00:03:07.200
it over it it says, “Click to make a Live
Paint Group.” I’m going to click once. Now,

00:03:07.200 –> 00:03:10.960
I have a Live Paint Group where I can
fill each pie slice with the color.

00:03:12.160 –> 00:03:18.480
Alright, so let’s start with colors. I’m going to
go to a shape. Make a circle. It’s default white

00:03:18.480 –> 00:03:24.240
and black right now. I’m going to turn off its
stroke and come into its fill. Double click. So,

00:03:24.240 –> 00:03:30.160
when we have a color picker, you see that we have
HSB which is the Hue, Saturation, and Brightness.

00:03:30.160 –> 00:03:36.960
We have RGB which is our light colors: red green
and blue. We have CMYK which is our ink colors:

00:03:37.520 –> 00:03:45.840
Cyan, Magenta, Yellow, and Black. And, we have our
HEX colors. All right, so we are going to focus on

00:03:49.760 –> 00:03:50.880
HSB for now.

00:03:53.760 –> 00:03:58.720
Our colors are going to use this
rainbow strip and we’re going to

00:03:58.720 –> 00:04:05.360
move in 30-degree increments. Saturation
100 and Brightness 100 give us our color.

00:04:06.640 –> 00:04:12.240
If I change my saturation to zero, it’s going
to be white no matter what the color is.

00:04:12.240 –> 00:04:17.440
So, you can see I’ve now moved up into yellow;
it’s still white. Let’s bring it back to 100.

00:04:18.560 –> 00:04:27.120
If I bring my brightness to zero no matter what
my color is, it’s going to stay black. Right,

00:04:27.120 –> 00:04:36.080
so we have brightness saturation and the hue
all right, so we’re going to start with Orange.

00:04:36.080 –> 00:04:45.280
Just 30. Okay, so now we’re going to use our
Live Paint Bucket and we’re going to put Orange.

00:04:46.480 –> 00:04:51.040
All right, now we’re going to come into
our color add 30, so now we have 60.

00:04:52.560 –> 00:04:56.240
That’s our yellow. Add 30, 90,

00:05:02.320 –> 00:05:03.200
120,

00:05:07.120 –> 00:05:12.560
150, 180,

00:05:18.800 –> 00:05:24.720
210, 240,

00:05:29.360 –> 00:05:30.160
270,

00:05:34.400 –> 00:05:37.760

  1. If you click Tab and
    you move to the next field,

00:05:37.760 –> 00:05:43.600
it will show what your color is
going to look like up here. 330.

00:05:48.720 –> 00:05:51.840
360 to our red.

00:05:52.400 –> 00:05:59.920
All right, so we have our color wheel. So we can
drag across and select it all. They all have a

00:05:59.920 –> 00:06:04.320
stroke of black. We’ll say that “None” so that
we can see the colors right next to each other.

00:06:05.600 –> 00:06:10.160
If you want to see it in contrast with the
black background, you can come into our Ellipse,

00:06:10.960 –> 00:06:17.520
grab Rectangle, Click. Eight by eight is
good. We’re gonna change that color. Remember,

00:06:18.880 –> 00:06:24.240
if we turn down the brightness to zero of
any color in HSB, it’s going to be black. So,

00:06:24.240 –> 00:06:28.960
now we have black we can use our
object arranged to send it back

00:06:29.760 –> 00:06:35.440
and we can center it up using our Alignment
Tools and now you can see it with black.

00:06:38.480 –> 00:06:43.520
So, this is an HSB Color Wheel and shows
you how the increments of 30 degrees

00:06:44.880 –> 00:06:52.160
for your hue change all the colors that
you would have in your Color Wheel.

Happy Designing!

About the author

Kelly Barkhurst

Designer to Fullstack is my place to geek out and share tech solutions from my day-to-day as a graphic designer, programmer, and business owner (portfolio). I also write on Arts and Bricks, a parenting blog and decal shop that embraces my family’s love of Art and LEGO bricks!

Add comment

Recent Posts

Archives

Categories