
If you are new to Photoshop, understanding how measurements work can be confusing, especially when switching between web and print projects. Photoshop lets you view and enter sizes in pixels, inches, millimeters, and more, but not all unit fields or dropdowns change automatically. This guide will help you learn how to change units in different parts of Photoshop. It also includes a handy trick to change the top toolbar units using Control-click on Mac or right-click on Windows.
🎥 Prefer to watch? Check out the full video tutorial on YouTube.
1. Change Your Global Unit Settings
Start by setting your preferred units in Photoshop’s settings.
Open a document and go to:
- On a Mac, Photoshop then Settings and then Units and Rulers
- On Windows, Edit then Preferences and then Units and Rulers
Here, you can choose pixels, inches, or millimeters for your rulers. Click OK to apply your choice. This setting controls your rulers and how dimensions appear in panels such as Properties.
2. Drawing Shapes and Mixed Units
Draw a shape using the Rectangle Tool (shortcut U).
When your shape is selected, open the Properties panel. If it is not visible, open it from Window then Properties.
You will see the width and height displayed in the units you chose. However, you may notice that the top toolbar still shows different units. This happens because the top toolbar units do not always update automatically….
3. The Toolbar Trick
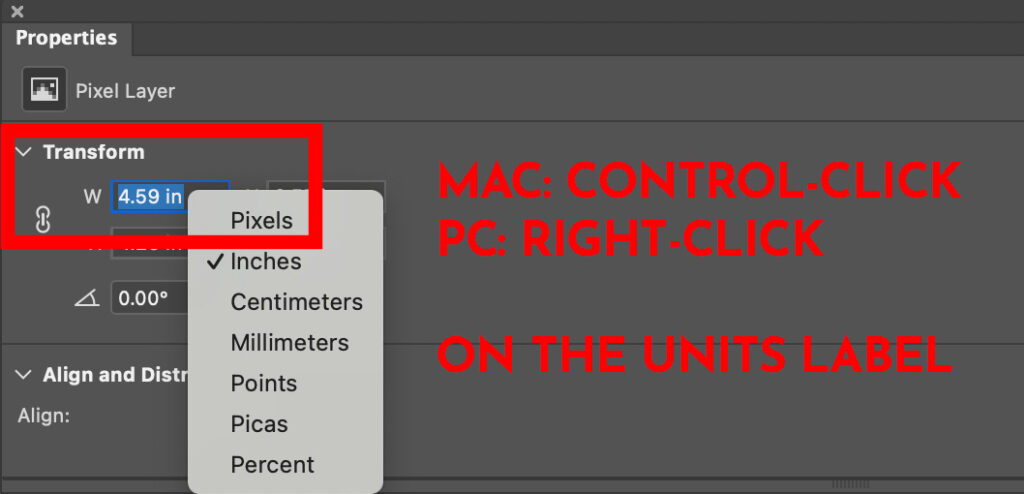
To change the units in the top toolbar or the Properties window:
- On a Mac, Control-click on the units label (for example, “px” or “in”).
- On Windows, right-click on the units label.
A menu will appear where you can switch to pixels, inches, millimeters, or other units. This will allow you to make the toolbar match your Properties panel.
This trick is especially useful because just clicking normally on the unit measurement label does nothing.
4. Do the Changes to PhotoShop Unit Settings Stick?
Changing the Units and Rulers preference stays saved between Photoshop sessions.
When I make a change in the Options Toolbar and then create a new document that unit change remains. Also, that unit change will remain as I tab through open files in PhotoShop; however, if I restart Photoshop, that manual change will no longer be visible.
5. Entering Measurements Manually
You can also type measurements with units included directly into unit fields, even when creating shapes.
For example, type 50px for pixels, 3in for inches, or 75mm for millimeters. Photoshop will understand and adjust sizing accordingly.
You can change the units shown in dialog boxes the same way as you do in the toolbar or Properties Window: Control-click on Mac or right-click in Windows on the unit label.
Frequently Asked Questions about Unit Measurements in Adobe Photoshop
Final Thoughts
Whether you are working on a website or preparing files for print, knowing how to control units in Photoshop helps keep your designs accurate. While many users know how to set units in Preferences, the Control-click or right-click trick for changing units is often overlooked and is very helpful.
Need better alignment in Photoshop?
Grids are your new best friend. Whether you’re designing icons, layouts, or print graphics, a well-structured grid removes all the guesswork. In this tutorial, Kelly walks you through three easy ways to set up alignment guides in Photoshop. You’ll learn how to turn on the Photoshop grid, drag your own guides, and use the “New Guide Layout” feature to create custom column and row grids in seconds. Think of this as your shortcut to perfectly spaced, professional-looking designs.
👉 Learn how to use a grid for alignment in Photoshop
While you’re customizing Photoshop settings, check out this quick tip for fixing the Eyedropper tool, too.