Mastering SVG Icons and Repeaters in Wix Studio: A Web Designer’s Guide

M

Are you a graphic or web designer just starting out with Wix Studio? If you’re trying to use SVG icons in a responsive layout, you’re not alone. Many creatives—especially those coming from tools like Adobe Illustrator—run into challenges when importing vector files into Wix and maintaining a consistent design.

In this guide, I’ll walk you through:

  • How to correctly upload and use SVG icons in Wix Studio
  • Why the Repeater component is ideal for responsive icon grids
  • Crucial tips for consistent icon sizing
  • The Illustrator export settings you must get right

Whether you’re designing a features grid, service icons, or an amenities list, this tutorial will help you build better and faster in Wix Studio.

Example of what I’m making is the “Room Amenities Include” icon/text grid below. Watch the full video for a step-by-step guide and walkthrough.

Example of icon grid and titles using Repeater Component in Wix Studio

Why SVG Icons Are Powerful in Web Design

SVGs (Scalable Vector Graphics) are a designer’s dream: crisp, resolution-independent, and lightweight. They’re perfect for responsive websites. But integrating SVGs properly in Wix Studio requires a few tricks.

The Problem: SVGs Behave Differently in Wix Studio

When importing icons into Wix, many designers expect settings like viewBox from their exported SVGs to carry through, controlling dimensions and alignment. Unfortunately, Wix doesn’t honor the viewBox the way traditional HTML/CSS does. This can cause your icons to appear inconsistent in size and alignment.


Step-by-Step: How to Use SVG Icons in Wix Studio

1. Use the Repeater Component for Responsive Icon Grids

If you want a uniform layout of icons and text—like 5 across on desktop and 2 per row on mobile—the Repeater component in Wix Studio is your best friend.

Here’s why:

  • Changes made to one repeater card apply to all, maintaining consistency.
  • Cards automatically stack based on screen size.
  • Easily control alignment of icons and text for pixel-perfect spacing.

Below is an example of the Repeater settings where per breakpoint you can select the number of items in the row.

Change the number in the Wix Studio repeater setting per break point

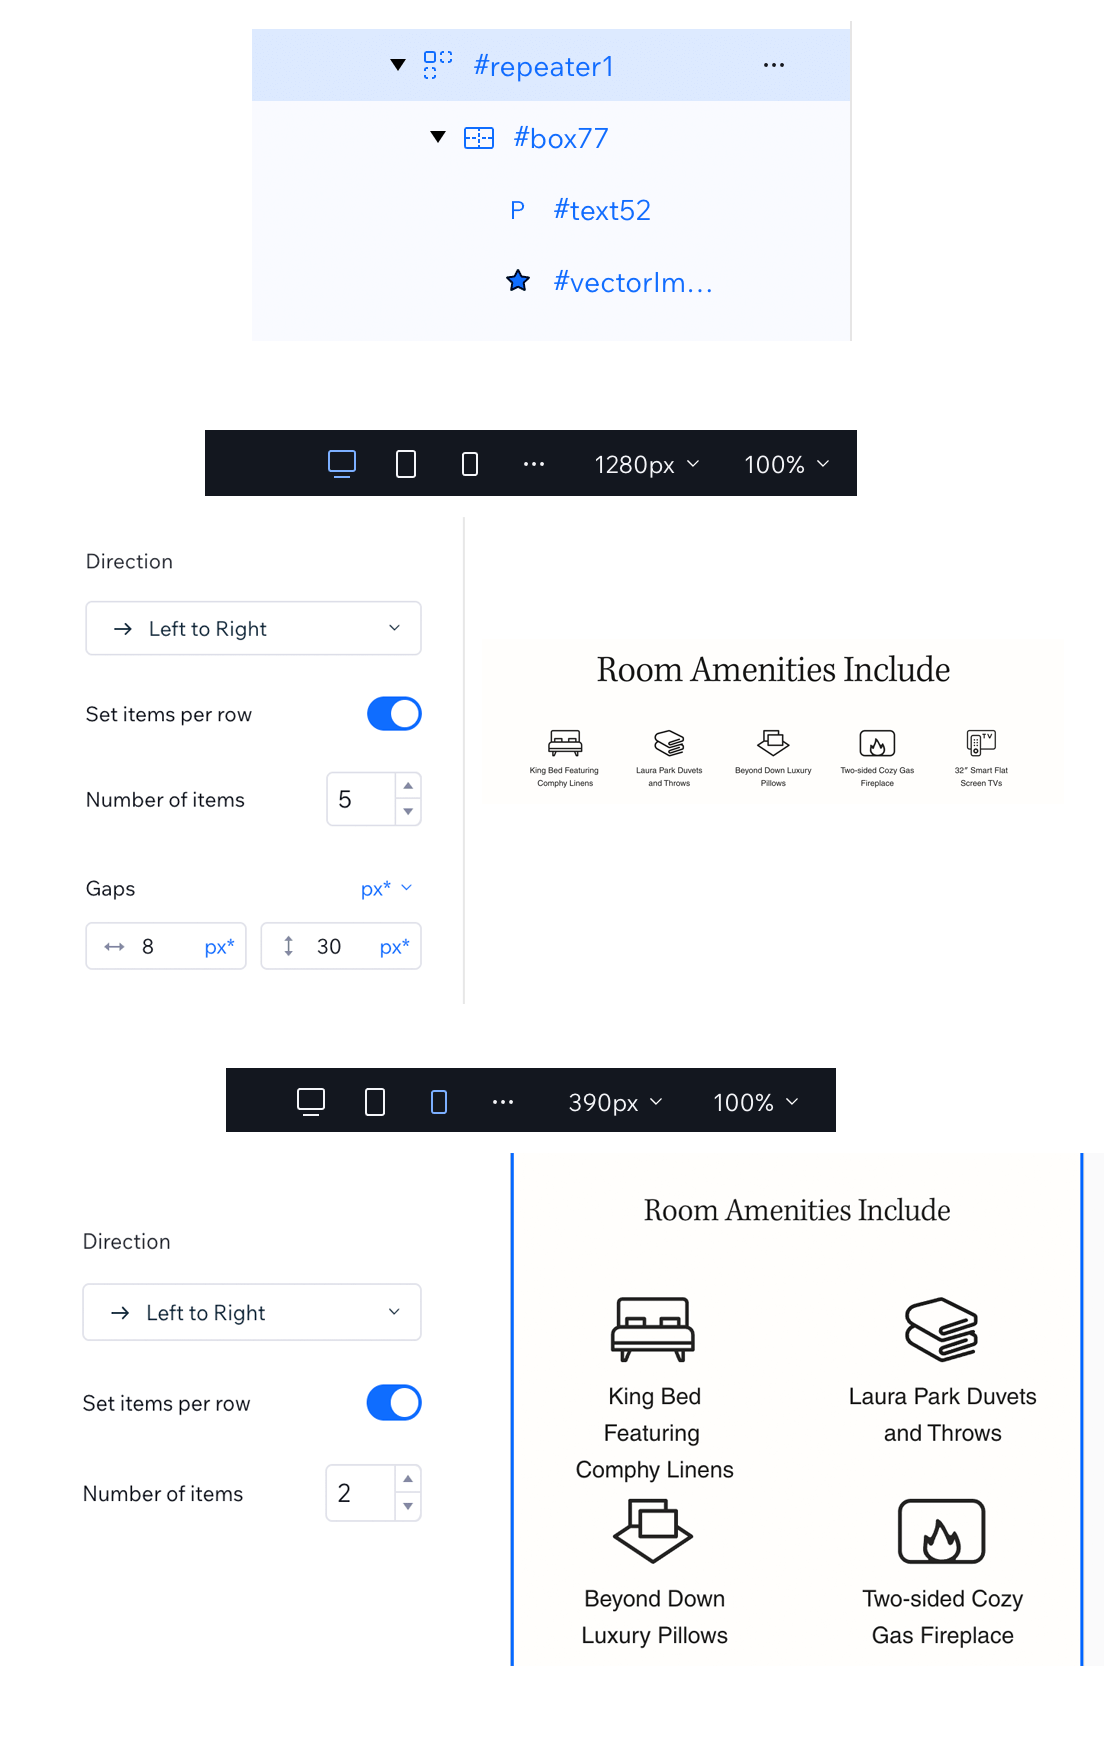
Within Wix Studio, you’ll find Repeaters in the “+” menu under “Layout Tools” and then “Repeaters.” Start with a layout that has an image and text—it’s perfect for icon blocks.

Find the repeater component in Wix Studio from the + and then Layout Options > Repeater

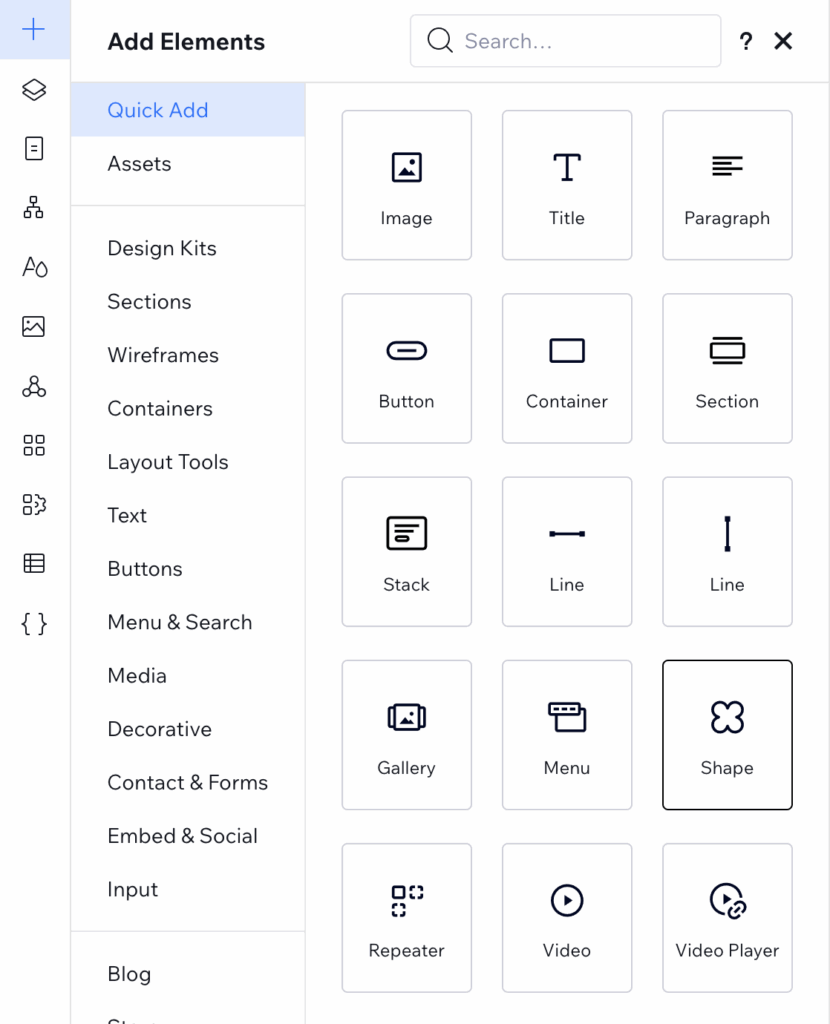
2. Don’t Use the Image Element for SVGs—Use Shapes Instead

You might think you can add SVGs using the Image element. Nope. Wix will tell you “only images can be chosen” when trying to select SVGs.

💡 Solution: Use Shapes instead.
Here’s how:

  • Click Quick Add → Shapes or Decorative → Basic Shape
  • Choose a basic shape, then select Change Shape
  • Browse your Site Files and select your uploaded SVG

Now your vector will appear as an editable “shape,” and you can control its color, size, and animation options in Wix.

Quick Add > Shapes for vector uploads such as SVGS

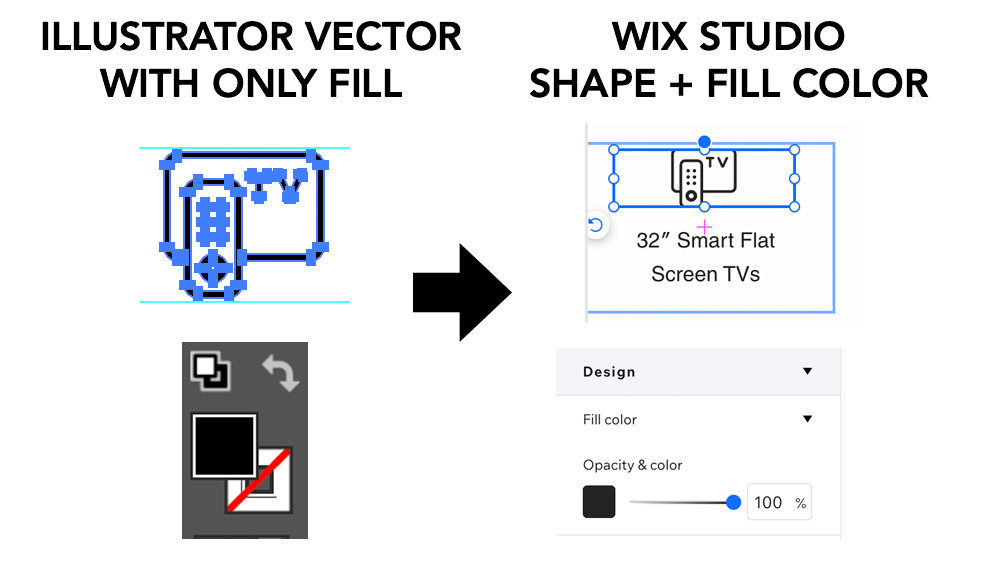
3. Prepare Your SVGs Properly in Illustrator

Here’s the biggest frustration: SVGs won’t size consistently unless you prepare them correctly in Illustrator.

Key Illustrator export tips:

Ignore the artboard.
Your final shape dimensions in Wix are based on the actual vector paths, not the artboard size.

Match icon heights manually.
Align icons by guides, not by viewBox or artboard alignment. All vectors should be the same visual height before exporting.

Avoid strokes. Use fills only.
Wix doesn’t interpret stroke widths well. To keep icons editable (for color changes in Wix), you need to:

  1. Expand the stroke in Illustrator:
    Object → Expand (check Fill and Stroke)
  2. Use Pathfinder → Unite or Divide to merge the shape and strokes.

This ensures your SVG uploads as a single filled shape that Wix recognizes.

Illustrator vector icons with fill only (no strokes) are uploaded to Wix Studio as shapes and then can have their color changed in Wix Studio.

Bonus Tips for a Polished Layout

  • Adjust icon sizing in Illustrator, not Wix
  • Set responsive rules in the Repeater: e.g. 5 per row on desktop, 2 per row on mobile
  • Once you add a shape to one card, it auto-populates to the rest—so test your style on one!

Troubleshooting Common SVG Issues in Wix

Problem: Icons are inconsistent in size
Fix: Check your vector icon sizes in Illustrator—expecially the icon height. Wix ignores your artboard height

Problem: Can’t change icon color in Wix
Fix: Make sure the SVG uses only fill, no strokes (Change this in Illustrator)

Problem: Can’t add SVG to image component
Fix: Use Shape elements instead of Image


Wrap-Up: The Wix Studio SVG + Repeater Combo is a Game-Changer

When set up correctly, SVG icons in Wix Studio Repeaters allow for flexible, clean, and responsive layouts—no code required.

To recap:

  • Use Shapes to insert SVGs
  • Use Repeaters for layout control
  • Prepare vectors in Illustrator with consistent fills and heights

Design smarter, not harder.


Watch Video

Hey web designers, today I am in Wix
Studio

and I wanted to talk about SVG images
or icons,

and I am hoping that I can save you
a lot of frustration.

If you are a graphic designer
or a web designer

and you are new to Wix,

which this is my situation here,
here are some tips

about how you can design and implement
with SVG icons.

And a smooth way.

All right.

So first my goal was to make

a block of icons

with titles that would be responsive,

and group

right into two columns and mobile

and probably five on desktop.

All right.

And first, that was kind of difficult
to figure out the best way to do it.

I started with working in,

advanced grid

and the advanced CSS

grid, and I tried the flex grid,

the flex container that Wix had.

And I will tell you what I found best,
because in this situation,

I want the icons to be the exact same size
as the text,

and I’m using them
as sort of cards, right?

So I used the repeater
and it has been perfect.

I would definitely recommend it.

So if you go to plus
and it is under repeaters

and you can see there’s even kind
of an example of a picture and text,

so I used this first one.

So an icon and text.

And when I make a card
any change to the card.

So let’s say we would

make the background white.

It does it to all of them.

Right.

So any change that
you make to one changes to all.

So that is really nice
and allows for the consistency of

if you need your text perfectly aligned

and you want your icons across the cards
to be perfectly aligned,

then the repeater is the out of the box,

component that you want to use in Wix.

Now here’s
where I wanted to rip my hair out.

First, if you make an SVG in illustrator

to add it in Wix is really easy.

So let’s jump into Illustrator
and I will show you.

So I have all of these amenities icons.

And how I’ve been used to working is
I would create them

or pull them from different icon
sets to make the collection that I needed,

and then I would make them
so that they looked good as far as sizing

with one another,
and how I would keep that sizing

as we move on to a website
is by using the view box, which is,

what it’s called in the CSS code

and XML script of the SVG,

versus in illustrator
we call it an artboard.

And so when you export from illustrator,

or you can say,
let’s just say we do export as

and I have SVG selected.

And if I say use artboard
it is going to make that the box

the size that I have my artboard set up.

So typically in a website,
if I am coding it, that is the way

that I would make sure that my icons
translate to the same ratio and sizes.

Once I’m in code.

However, this is what we’re going to find.

So let’s say, I have done that

and I’m going to show you an alternative

as also
if you have your, vector selected

and if you say clicked for, export
as a single asset

and we’ll call this lock box
and I’m going to shift click

to get two of them, I have to set here,
I’m going to say export.

We’re going to put them in this folder.

Perfect.

All right.

So as promised how to add an image.

So first I have these card.

And if I say add media.

It is going to let me upload.

So I’m going to lock that AC heater.

Okay.

And we’ll say heater.

Oh my goodness. Right.

So that just added it
to every one of the cards.

So this is how you can see
how they are connected in the repeater.

So I’m going to undo command Z.

Right.

So if I have my repeater active
now I can say add item.

Now an item is
what they’re calling the card.

And you can see I now have another card
here, another item in my cards.

All right.

So now I can select the actual vector
image to

that is considered a shape in Wix.

So if you try to
let’s just say I go up here

and I say add elements
and quick add and I choose an image

okay.

So if you’ve dropped an image
and you say change image

and you try to select your SVG,

it’s going to say update
only images can be chosen.

So number one, that’s kind of frustrating
because you’re thinking, I see it

in my images and in my site files,
but you can’t access it,

so you cannot add an SVG to the image.

Component. However,

if you use add a shape.

Now from a shape
you can change your basic shape.

Now you’re still
you’re going to automatically be media

from Wix, but you can go in to site files

and now you can choose

your vector SVG and it will show up.

All right.

So add shape is the secret.

There.

All right.

So in our repeater we can grab our image,
change the basic shape.

We’re going to do that.

You see here at the
page we can change our word.

I think it was ten when you see complete

okay.

Now let’s say we’re looking here

and we think it is too tight.

We can do a few things.

We can actually make the box itself
a little taller.

And that changes all of them.

Right.
So that’s the consistency of the repeater.

So that’s really nice.

So let’s say we go back to this card
and we say add item.

Now it will start to stack.

So this is the cards that they do
continue to stack

I set how many items per row.

And that’s how we know how it is
going to stack.

If I come in to my tablet view
you can see the change here.

Is that I set it to four.

And when I come to
mobile, I have it set to two.

And that is right here.

So that is how you, can change it
for each of the views.

All right.

So what I ran into is that my icons,

even though I set them up
the way that I wanted them in illustrator,

every time I was placing them,
I could not figure out

the settings
to be able to get the images consistent.

I was selecting them,
I was playing with it.

My gear settings,
you can say keep original proportions.

I was looking with scale size
proportionately.

I made sure I was in advanced settings
and I was trying all different types

of height widths, combos,
and I was just getting such

an inconsistency across my icons.

So what I realized was a few things

one, the view box does not

come into play,

and when they strip it
out, it’s not part of it.

So the only thing that is coming in
is actually the shape.

Like the outline and the SPG
is the size of whatever your content is.

So what this meant
I needed to do to get consistent

icons is
I needed to come back in the illustrator

and instead of aligning them

with my artboard, I put in these guides

and I actually made them and adjusted them
so that they were all the same height.

And that is how I’m basing mine.

That they were all the same height,
and now that they’re the same height,

I am able to keep them here
to look consistent.

So you are going to have to do
your adjusting

for sizes in illustrator
not based on your artboard.

So actually the file,

just the vector just the art is

how wide your image is going to be
or your shape as they’re calling it.

Here.

All right.

The second part is that

if you load in your SVG

and it is only a fill color,
you cannot have extra strokes.

And I’m seeing that their recommendations
are bring it in as black.

But I’m not sure that that really matters
what does matter

is that you don’t have a stroke,
that it really is just the fill.

Then you can use this fill color
and it will allow you to

to select
and change the color of your icon,

which is going to be really great
for being able to do adjustments.

Opacity or color change and animation.

So there’s a lot of other things
that you might want

to, just make sure that you’re
bringing them in in a way

where the Wick Studio
can now, adjust the color.

All right.

So the secret to be able to do that,
if you do not know already.

So let’s say we’re looking at this icon,

and if I’m here, I can see that has a fill
a black and a white outline.

So in this case
the white outline was used to help make it

the same stroke size as the other icons,
because by default it was a little bigger.

All right.

So how I would adjust this one I’m going
to make a copy so that you can see it.

So we have a stroke NFL.

So I’m going to say object expand.

That gives me my fill in my stroke.

And what this does is now
you can see it’s a lot more blue.

But basically it expanded the stroke.

So now it is along the outside
of the stroke, not on the inside.

So now in this case, I would do
pathfinder divide.

This is going to allow me
to grab the white.

And now when I delete the white,

it should actually
delete all of that shape.

So I have

actually been able to make the black
a little bit thinner.

You can see sometimes
depending on how your shape was made,

you actually have a lot of other shapes
going on in there

that you have to continue to delete out

until you get back
to, you know, in this case,

the black icon that I want
and you just keep deleting.

All right.

So now when I click on this
you can see that it’s all filled okay.

So that is what you want
your icons to look like.

You want it to be the fill not the stroke.

So if we look at something else let’s see

if there’s other ones
that might still happen.

Okay.

So like this one is all a stroke, right.

So what you would do is

object expand fill and stroke or checked.

Now you can see the lines are around
the outside not on the inside.

Now these are still individual shapes.

So the next thing is going to be
Pathfinder.

And we’re going to unite.

Now you can see
all those little lines have gone away.

And this is actually a fill
now of the icon.

So this is the type of file
that you want to be able to upload.

All right.

So the tips are use shape not image.

Make sure that your SVGs are

filled not stroked.

And make sure that you do your sizing

in illustrator because your view box
is not going to carry through.

So if you’re running into
you cannot get your icons to be

the right kind of shape,
and the right ratio

and that some are large
and some are small,

then the secret is to adjust them
outside of Wix.

First.

And then the other thing is that

if you are trying
to make a block of icons,

then I think the repeater
is the perfect component for you.

All right, so if you enjoyed this
and found this useful,

please give it a thumbs up. Subscribe.

This channel is designer to full stack

and I am a graphic designer.

And over the last 20 years
my skills have expanded

into web development
and full stack design.

And so this channel
has everything along that spectrum.

So check out the description

to see all the different categories
where you might fall into you.

All right. Happy designing.

Happy Web Designing!

About the author

Kelly Barkhurst

Designer to Fullstack is my place to geek out and share tech solutions from my day-to-day as a graphic designer, programmer, and business owner (portfolio). I also write on Arts and Bricks, a parenting blog and decal shop that embraces my family’s love of Art and LEGO bricks!

By Kelly Barkhurst

Recent Posts

Archives

Categories