What’s the best settings to use when aligning your text to the left in InDesign? Well that depends on your goals. Here are a few options. Watch or read below.
Optical Alignment Tips in InDesign Video
00:00:00:11 – 00:00:02:11
Hi InDesign users.
00:00:02:11 – 00:00:05:11
I’m Kelly, with Designer to full stack,
00:00:05:21 – 00:00:08:12
and my videos span
00:00:08:12 – 00:00:12:05
from Adobe products
to programing and coding.
00:00:12:05 – 00:00:15:19
So wherever you fall in that spectrum,
00:00:15:19 – 00:00:19:17
I’m sure you’ll find videos that help you
and what you’re doing.
00:00:19:28 – 00:00:24:23
So today we’re looking at InDesign
specifically and text alignment, and I’m
00:00:24:23 – 00:00:29:16
looking at left align text alignment
and the options that you have in InDesign.
00:00:29:27 – 00:00:33:15
And this is actually a follow up video
to an older video
00:00:33:20 – 00:00:36:20
where I was showing how I did left
alignment
00:00:37:12 – 00:00:41:11
and a viewer said, hey, did you know
there’s an easier way to do this?
00:00:41:11 – 00:00:46:29
And so I wanted to kind of demo why
you would use one method over the other
00:00:46:29 – 00:00:50:25
and how they both can work in conjunction
with each other or be perfect
00:00:50:25 – 00:00:52:00
for specific goals.
00:00:53:03 – 00:00:54:02
All right.
00:00:54:02 – 00:01:00:02
So in
InDesign we have a column of text here.
00:01:00:20 – 00:01:04:11
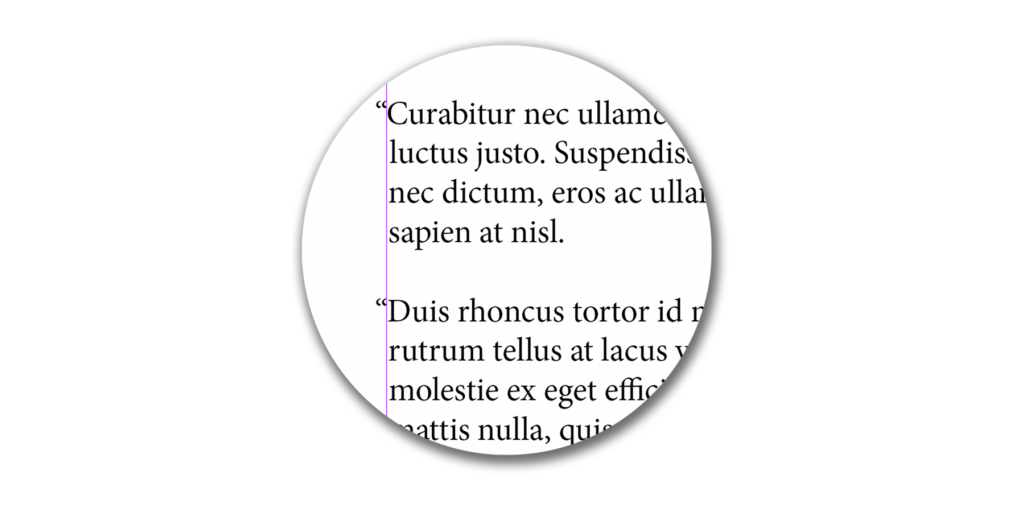
And it is set in minion Pro
which is a serif font.
00:01:04:21 – 00:01:10:05
And you’ll see that I have put
a few quotes into the ipsum text.
00:01:10:05 – 00:01:11:29
So I’m going to go ahead and zoom
in for you.
00:01:11:29 – 00:01:14:29
So you can see it
even a little bit better.
00:01:15:20 – 00:01:16:08
All right.
00:01:16:08 – 00:01:19:21
And right now the text and the quote,
00:01:19:21 – 00:01:22:23
if it begins a sentence are aligned.
00:01:23:02 – 00:01:27:06
So, designers
who are trained in typography
00:01:27:15 – 00:01:30:28
like to do what we call
hanging indentation.
00:01:32:05 – 00:01:36:28
So what that means is that hanging quotes,
00:01:37:13 – 00:01:40:00
is these quote
00:01:40:00 – 00:01:43:14
marks
would be to the left of where the text is.
00:01:43:14 – 00:01:46:14
So they would actually be moved
into the margin.
00:01:46:14 – 00:01:49:02
And InDesign, because it is set up
00:01:49:02 – 00:01:53:08
to, layout books and magazines
and newspapers
00:01:53:08 – 00:01:58:01
and columns of text know that designers
want these hanging quotation marks.
00:01:58:11 – 00:02:01:11
And so we have this tool called story.
00:02:01:23 – 00:02:04:02
You can open it by going to window
00:02:05:23 – 00:02:08:14
and it is under.
00:02:08:14 – 00:02:10:00
Let me get there.
00:02:10:00 – 00:02:13:00
Type in tables and story okay.
00:02:13:09 – 00:02:15:19
So window up at the top I’m sorry.
00:02:15:19 – 00:02:18:11
It looks like my,
00:02:18:11 – 00:02:21:26
I’m not showing that top bar
I should have, but it is under Window
00:02:21:26 – 00:02:24:06
Type > Story.
00:02:24:06 – 00:02:26:19
All right, so there’s only one option.
00:02:26:19 – 00:02:29:16
There isn’t. Show more under story.
00:02:29:16 – 00:02:32:23
It is really click
optical margin alignment.
00:02:32:26 – 00:02:36:22
And when I click that
it defaults to 12 point.
00:02:36:22 – 00:02:40:06
And you can see my quote mark is hanging
00:02:40:17 – 00:02:46:23
now dependent on the font and the size
and all kinds of settings per font.
00:02:47:05 – 00:02:51:01
12 point might be the perfect amount,
or it may not be.
00:02:51:27 – 00:02:54:24
So in this case,
you can see it’s not perfectly aligned.
00:02:54:24 – 00:02:57:24
The goal is that
my D would align with all the other text,
00:02:58:03 – 00:03:01:03
and you can see
what are the things that it aligns.
00:03:01:04 – 00:03:04:14
So number one story
optical margin alignment
00:03:04:14 – 00:03:07:14
is going to have quote marks.
00:03:08:08 – 00:03:09:07
Hang.
00:03:09:07 – 00:03:12:13
It’s also going to have some serifs hang.
00:03:12:13 – 00:03:14:07
So you can see the capital V.
00:03:14:07 – 00:03:17:07
The top part of that serif is hanging out.
00:03:17:12 – 00:03:22:20
And some letters that have curves
will also hang on this one.
00:03:22:20 – 00:03:25:23
You can see that the a
that serif is hanging.
00:03:26:21 – 00:03:28:01
So with this selected
00:03:29:06 – 00:03:32:06
I’m going to go ahead and increase
00:03:32:13 – 00:03:37:19
my point
until I find the one that actually has it
00:03:37:19 – 00:03:40:01
optically aligned the best.
00:03:40:01 – 00:03:43:12
And for me with the settings that I have,
00:03:43:20 – 00:03:47:09
I feel like 18
is just about perfect there.
00:03:47:09 – 00:03:47:20
Right?
00:03:47:20 – 00:03:50:20
So the stem of that D is aligning
with the R.
00:03:51:24 – 00:03:52:07
All right.
00:03:52:07 – 00:03:55:07
So what that means is
if I put a paragraph break
00:03:55:18 – 00:03:58:07
right here right.
00:03:58:07 – 00:04:01:09
Those quotes are hanging outside as well.
00:04:01:27 – 00:04:03:26
And you can see the C.
00:04:03:26 – 00:04:06:04
Here’s a curve.
00:04:06:04 – 00:04:10:03
So if I actually delete the quotes
you can see that
00:04:10:03 – 00:04:14:15
the C is optically aligning
with our other letters as well.
00:04:16:09 – 00:04:16:24
All right.
00:04:16:24 – 00:04:21:21
So that’s when we use optical margin
alignment is when we are trying
00:04:21:21 – 00:04:26:17
to align columns of text
to be visually optically aligned.
00:04:29:08 – 00:04:29:20
All right.
00:04:29:20 – 00:04:32:20
So now
we’re going to look at another example.
00:04:33:28 – 00:04:36:25
All right so over here
I have all capital letters.
00:04:36:25 – 00:04:41:02
And I have three examples of this text.
00:04:41:10 – 00:04:43:19
So forge by the fearless.
00:04:43:19 – 00:04:47:14
And you can see in this top example.
00:04:51:06 – 00:04:52:18
That by default
00:04:52:18 – 00:04:56:19
the apps are further
to the left than the B.
00:04:57:09 – 00:05:02:09
So if this was a headline, let’s say,
00:05:05:01 – 00:05:06:20
On a poster or something
00:05:06:20 – 00:05:12:05
where I really wanted to be precise,
then I would want to move that B over.
00:05:12:05 – 00:05:12:15
Right?
00:05:12:15 – 00:05:15:15
I would want it
to be perfectly aligned as well.
00:05:15:17 – 00:05:21:29
So your option
might be to look at your story.
00:05:21:29 – 00:05:24:25
So if we go into story.
00:05:24:25 – 00:05:26:24
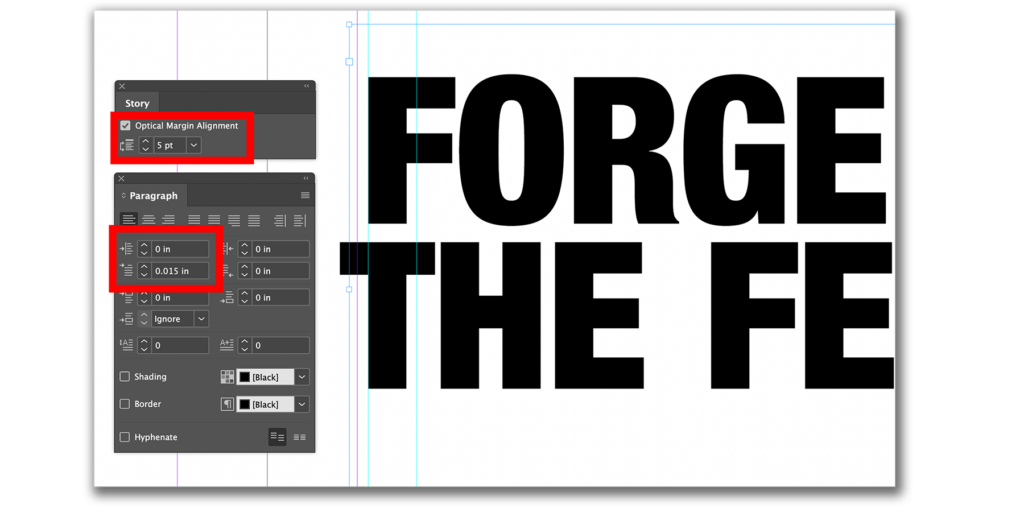
and I click optical margin
00:05:26:24 – 00:05:30:04
alignment, it moves them all.
00:05:30:07 – 00:05:32:23
And in this case
00:05:32:23 – 00:05:37:11
you can see
that they are really pretty aligned.
00:05:37:11 – 00:05:39:07
Right. So that’s beautiful.
00:05:39:07 – 00:05:43:28
So one of the uses is you can start
00:05:43:28 – 00:05:47:04
with optical margin alignment
and see if it aligns it.
00:05:48:00 – 00:05:51:20
Now let’s say our headline
with the second one.
00:05:52:04 – 00:05:55:04
And we’re aligning the F and the T.
00:05:55:22 – 00:05:59:28
So I can see that right now
without optical margin alignment
00:06:00:06 – 00:06:03:03
the F is not perfectly aligned with the T,
00:06:03:03 – 00:06:05:19
although the T does hang over to the edge.
00:06:05:19 – 00:06:10:12
So if I put optical margin alignment
it does hang more.
00:06:10:12 – 00:06:12:26
But you can see it is not perfect.
00:06:14:23 – 00:06:17:23
If I try to adjust it.
00:06:19:10 – 00:06:21:03
It’s not really doing much right.
00:06:21:03 – 00:06:24:03
And if I go down.
00:06:29:13 – 00:06:32:02
We’re still not getting anything.
00:06:32:02 – 00:06:35:06
So here’s an example
of where it’s not precise.
00:06:35:14 – 00:06:39:10
And I would want to go in
and manually move it as well.
00:06:39:24 – 00:06:42:26
And so this would not be across
lots of columns.
00:06:42:26 – 00:06:45:11
But this would be
for a very specific headline
00:06:45:11 – 00:06:47:20
that I want to be perfectly aligned.
00:06:47:20 – 00:06:53:05
So in this case I can use
the, left margin.
00:06:53:15 – 00:06:55:15
Now let’s see here.
00:06:55:15 – 00:06:57:20
This first one.
00:06:57:20 – 00:06:58:00
Right.
00:06:58:00 – 00:07:00:15
And so I’m moving just the first line.
00:07:00:15 – 00:07:05:08
And you can see if I use the arrows,
it jumps all the way to 0.0625.
00:07:05:08 – 00:07:08:08
But maybe I just need it to be one.
00:07:09:02 – 00:07:09:12
Right.
00:07:09:12 – 00:07:12:02
And maybe I need it to be 0.15.
00:07:14:03 – 00:07:17:11
And so that is a way that I can use both
00:07:18:07 – 00:07:21:07
to manually get a perfect alignment.
00:07:21:24 – 00:07:22:01
Right.
00:07:22:01 – 00:07:25:01
So that would be a use case.
00:07:25:11 – 00:07:26:20
Now in this case
00:07:26:20 – 00:07:30:09
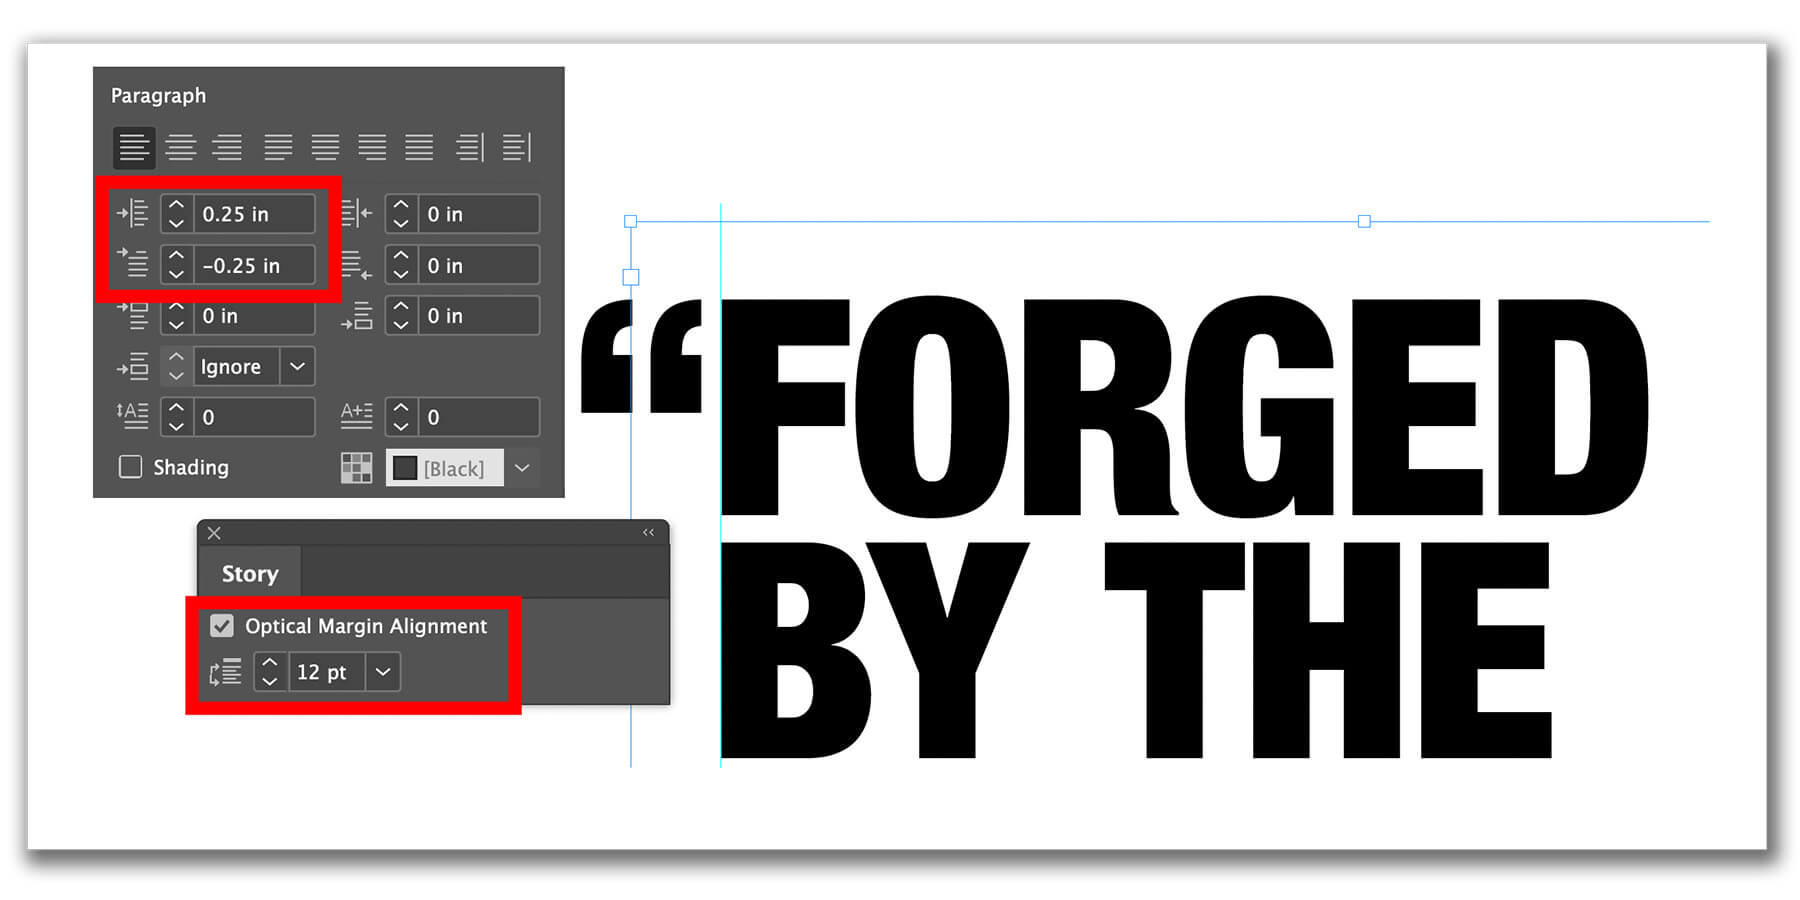
I have all capitals and hanging quotes.
00:07:30:13 – 00:07:33:13
So if I click optical margin alignment
00:07:33:15 – 00:07:37:07
it aligns one quote, not both.
00:07:37:21 – 00:07:41:21
So in this case again
I probably want both hanging.
00:07:42:16 – 00:07:46:21
So I would select them
and I could manually.
00:07:49:03 – 00:07:50:09
Move them.
00:07:50:09 – 00:07:52:24
Now I’m moving into the margin.
00:07:52:24 – 00:07:55:19
So when I want to go negative it’s
00:07:55:19 – 00:07:58:19
saying it’s an invalid indent value.
00:07:58:29 – 00:08:02:04
So the first thing I’m going to have to do
is move everything in.
00:08:02:04 – 00:08:05:04
And then I can do the exact opposite out.
00:08:05:11 – 00:08:08:14
So whatever I am going in
00:08:08:21 – 00:08:12:00
with this left margin, then I need to.
00:08:12:26 – 00:08:16:21
And if you try to go too much
this next time, it will tell me too far.
00:08:16:28 – 00:08:19:04
You cannot extend outside the text frame.
00:08:21:10 – 00:08:21:25
Right.
00:08:21:25 – 00:08:24:21
Okay, so now
00:08:24:21 – 00:08:27:00
I have perfectly aligned
00:08:27:00 – 00:08:30:00
and we can pull a ruler over and see here.
00:08:31:10 – 00:08:31:26
Okay.
00:08:31:26 – 00:08:34:27
So this is how you use
both story and indents.
00:08:35:07 – 00:08:40:11
And so when you have your text selected
in the text box
00:08:40:11 – 00:08:44:20
you are going to be given up here
at the top you’re align left align center.
00:08:44:20 – 00:08:46:02
Let’s say you have align left.
00:08:46:02 – 00:08:50:23
Then you’re going to have your left indent
and also your first line left indent.
00:08:51:02 – 00:08:55:08
And so by adjusting
all your text to be left indented,
00:08:55:08 – 00:08:59:27
you can then use negative to pull out
and have hanging quotes
00:09:00:07 – 00:09:03:12
or to better align any of your letters.
00:09:03:22 – 00:09:08:02
And I feel like the use case for
that is specifically really for headlines,
00:09:08:08 – 00:09:12:05
whether that a poster,
the cover of a book,
00:09:12:05 – 00:09:15:16
a headline or subheadline
in a magazine article,
00:09:15:22 – 00:09:19:15
that’s where you’re wanting to be precise
with your alignment, and especially
00:09:19:15 – 00:09:26:06
when it’s capital letters, even more,
visible when it’s not quite aligned.
00:09:26:14 – 00:09:26:24
All right.
00:09:26:24 – 00:09:30:01
So I hope this combination
of indenting and optical
00:09:30:01 – 00:09:33:07
margin alignment
help you in your InDesign endeavors.
00:09:34:01 – 00:09:39:13
If you found this useful, please
make sure to like or comment or subscribe!
00:09:39:16 – 00:09:42:24
I look forward to getting
to share more tips
00:09:42:24 – 00:09:45:24
with you and, be with you on your journey
00:09:45:24 – 00:09:49:28
as you increase your skills
as the designer and programmer.
1. Use Story > Optical Margin Alignment
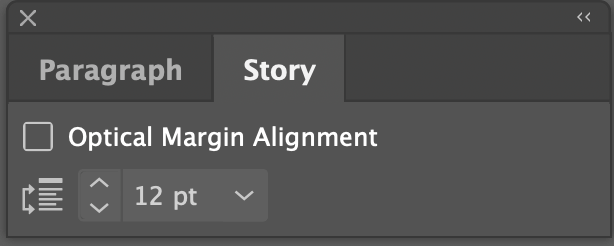
In InDesign, there is a window called Story. The key feature of this window is a checkbox labeled “Optical Margin Alignment.” Checking this box improves the optical alignment of columns of text. Designers call this feature “Hanging punctuation.”
This allows punctuation, such as quote marks, serifs of letters, and even edges of some letters to “hang” outside of the main content’s vertical alignment, essentially moving them slightly into the margin. The pt box (12pt is default shown below) is your setting for how far to move them into the margin.
2. Use Left Indent or First Line Left Indent Only
Best for a headline or subheadline (instead of a paragraph or column or text) you can hand align using the left indent and first-line left indent options in the Paragraph window. These settings can be adjusted with or without the Story Optical Margin Alignment selection.
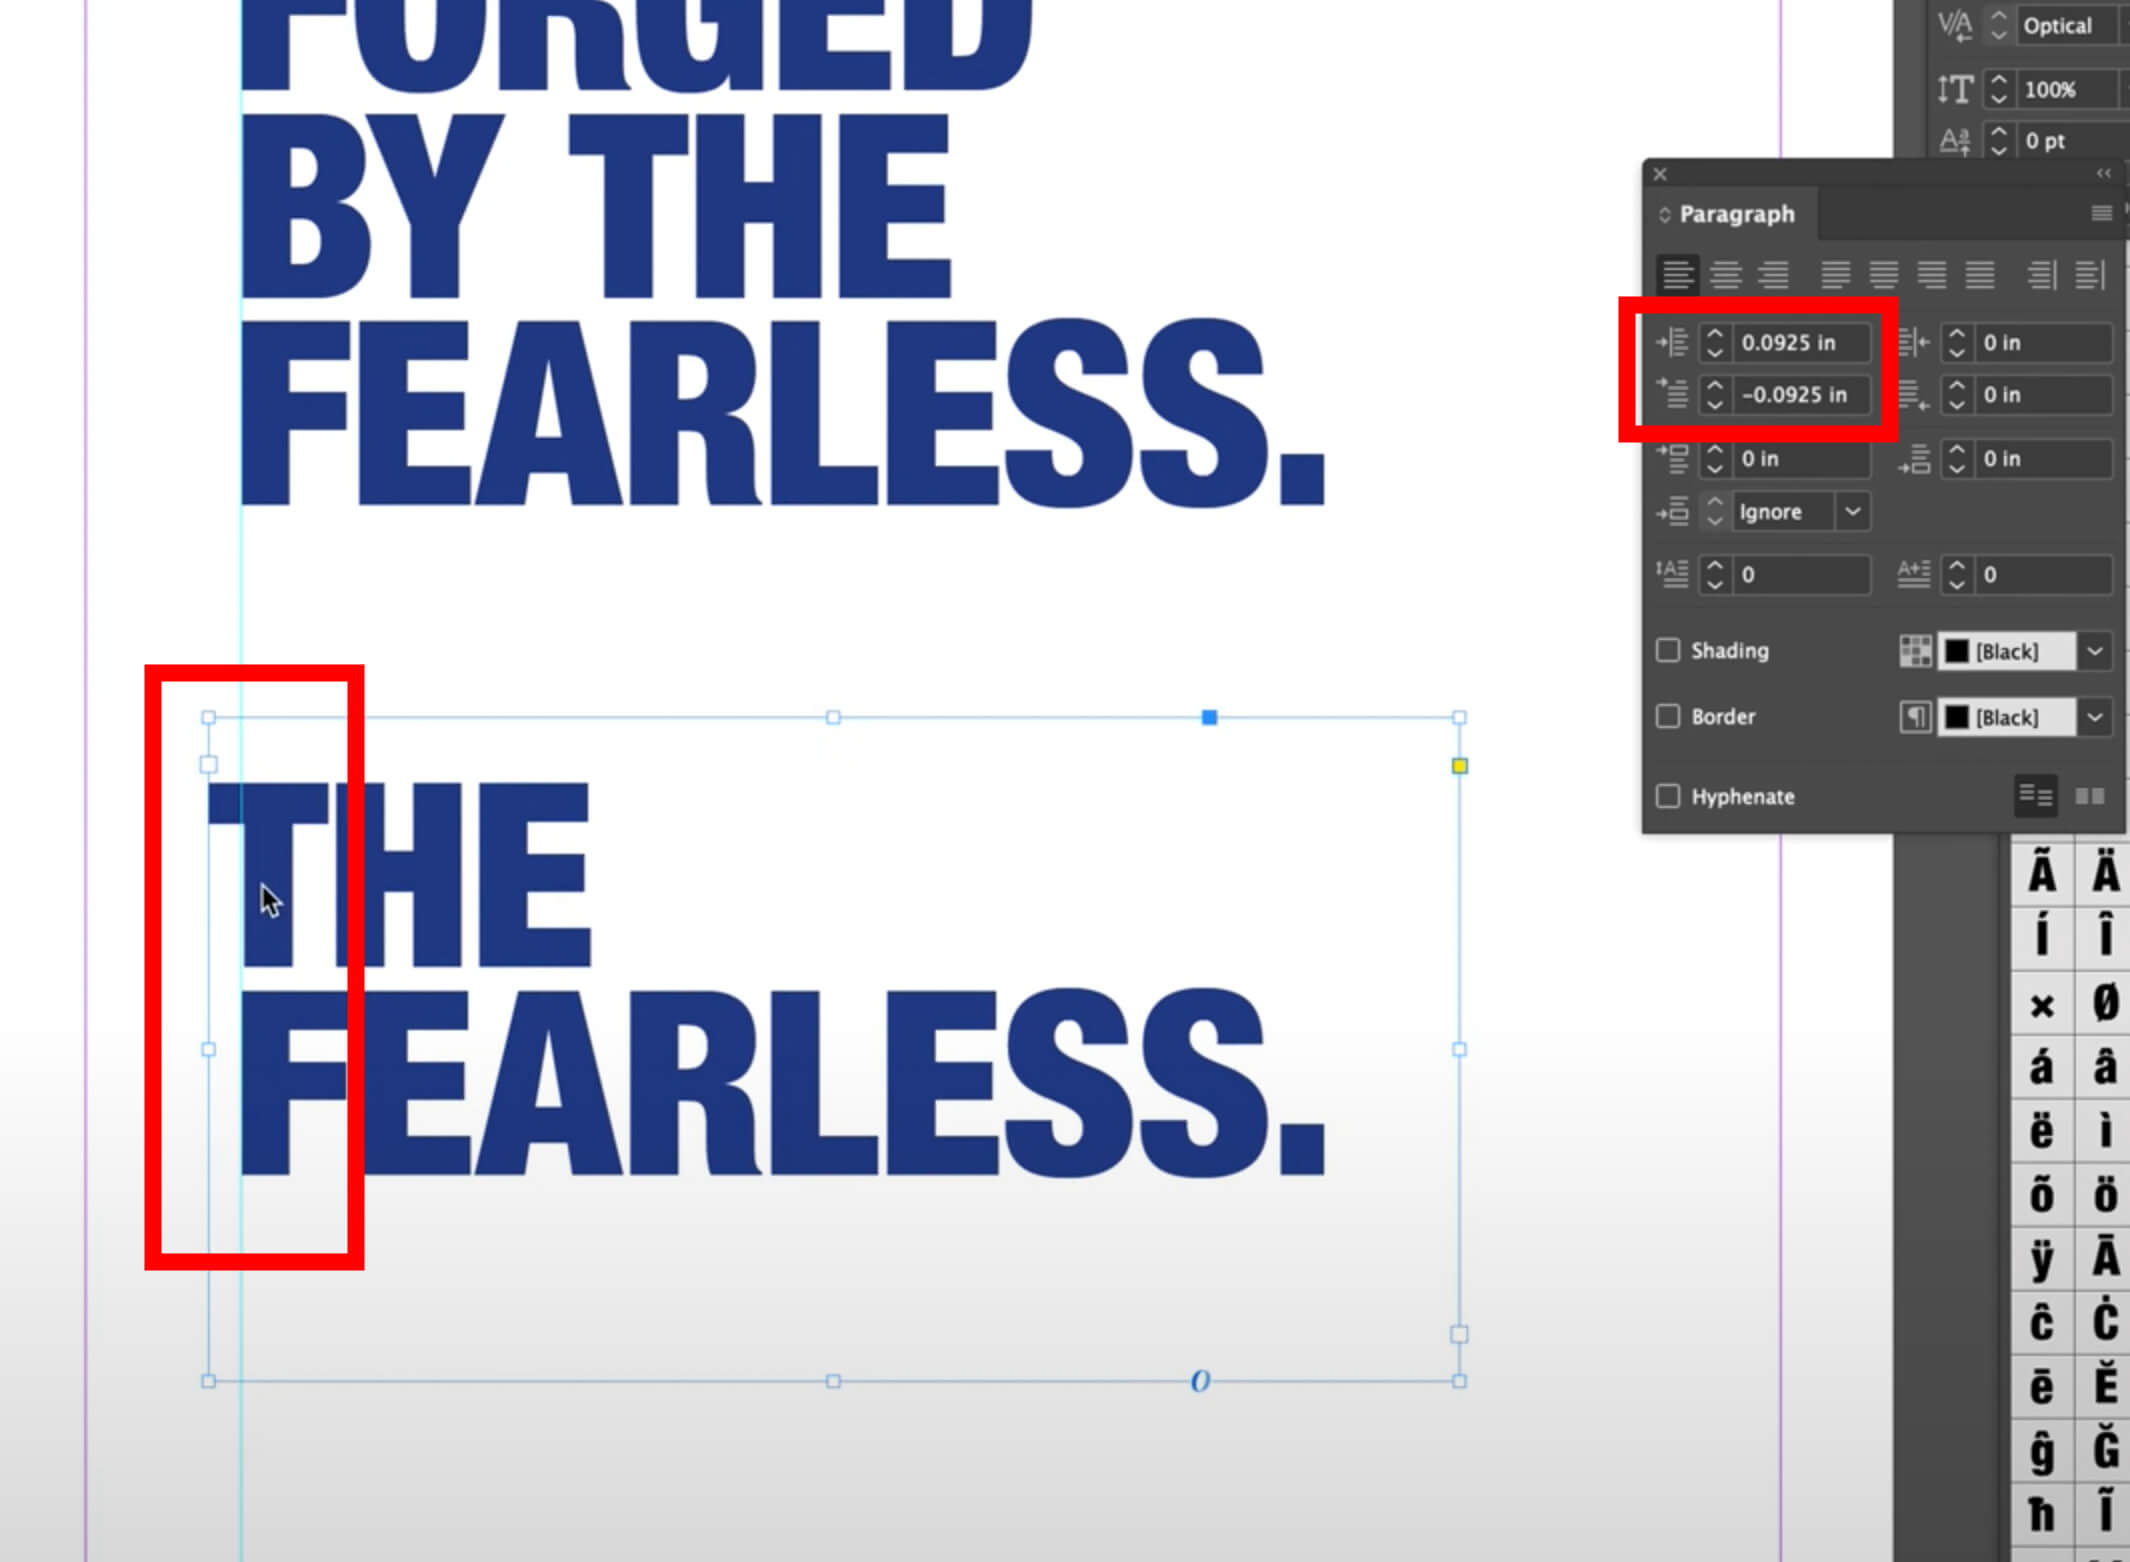
all right today we are in indesign and we are going to be looking at visual alignment so if you um see this box of text we have forged by the fearless and the stems of the f the b and the f you can see they’re pretty much aligned and that’s just by the automatic settings that we have for this type however if you look at the fearless you see that the strong visual line here that aligns the f the b and the f when it comes to the t the stem is offset and it does look like there’s been some movement right the t has a little bit um of uh overlap from the f but i think that um the stronger alignment would be if the stem of the t was aligned with the f so this is how to show you in indesign how you would change and do some hand alignment in your text so if i triple click i have all of the lines in my box of text and i’m using the paragraph window which can be accessed from window type paragraph you can see it’s already checked all right so the first one in if i kind of hover you can see the left indent and it is showing the entire line of text that’s what this icon means so if i
indent it by .0625 now i have space that i can pull a single line up to .0625 out so now i could come to the and if i go negative so that’s the down you can see it now moves and i could move it up to the amount that i have here so if i’m looking i can
put my words lined up with my guide which i clicked and dragged from my ruler and i can see it’s not quite aligned yet i can reselect it um let’s say i do nine here
i would grab my first and now i could
do up to the same amount
i can see it’s just about there right if i zoom in some of this is a little hand
um tedious so for both of these instead of nine maybe i just do one [Music]
and then my top i could do negative one
so you can see that um
you can really get into the details and in general we’ll say this is good enough it’s off just a little bit um but what this is to show you is that when you are designing and you’re looking for where you can align things the same beautiful alignments that you would get from a capital letter that all have the same bottom and same top or your x height when you’re working with your lower case letters you can create that vertically with just a little bit adjustments in your paragraph left indent and first line or whichever line has the letter that you want the stem to be aligned and not the edge of the letter