
As a designer and front-end developer building my first few Shopify stores, I learned a lot—fast. In this post, I’m sharing what I learned while migrating a WooCommerce store to Shopify and customizing themes using Liquid. You’ll find tips, references, and real code examples I now reuse in future projects.
Whether you’re designing your first Shopify store or starting development work inside a theme, this guide is packed with practical takeaways to help you build smarter and faster.
Shopify Tips and Tricks
Understanding Shopify’s URL Structure
Unless you’re using Shopify as a headless CMS, your store will follow a fixed URL structure—what Shopify refers to as “default paths.” These system-generated pages are permanent and can’t be deleted, even if they’re not linked in your navigation.
Examples of default Shopify paths:
yoursite.com/productsyoursite.com/collectionsyoursite.com/collections/all
These paths are always live and accessible, so it’s important to understand how they fit into your overall site architecture, especially if you’re customizing navigation or working on SEO.
Get familiar with the Liquid template language
One of the parts I’ve really enjoyed while building my Shopify stores is working with Liquid—Shopify’s open-source template language. It’s written in Ruby and powers the dynamic content you see across Shopify themes.
For me, it’s been especially fun to apply the coding logic I learned back in my 2021 Actualize Bootcamp, where we focused on Ruby, Rails, JavaScript, and Vue. Liquid feels like a natural extension of that skill set.
If you’re planning to customize your Shopify theme or do any real development work, getting comfortable with Liquid is a must. I recommend starting with Shopify’s official GitHub reference:
🔗 https://shopify.github.io/liquid/
Understand What a Collection Is (and How to Use It Right)
In Shopify, Collections are basically your store’s categories. You can create them manually or let Shopify build them automatically based on rules—like product tags, types, prices, and more.
Each product in your store is a single item for sale, and there are a few key ways Shopify lets you organize them:
- Product Type
- Vendor
- Collections
- Tags
Here’s how Shopify defines things:
“Product category is a standard field from the Shopify Product Taxonomy and can help with your tax calculations and when you sell products on your sales channels, such as Facebook. The product type is a custom field that is unique to your products.”
That distinction is important. You’ll pick from Shopify’s predefined product categories (which also map directly to Google Product Categories) so that your listings work properly across Google, Facebook, and Instagram.
Another Shopify note to keep in mind:
“If your customers checkout directly on Instagram or Facebook, then you must provide Google Product Categories for tax reasons even if you’re already providing a standard Shopify product category.”
Now for Product Type—this is where you create your own custom categories. It’s unique to your store and lets you organize your inventory in ways that make sense to you and your customers.
To sum it up, you’ll likely be organizing products using a combo of:
- Product type – A way to create a custom category for a product. The product type lets you define product categories other than the ones that are available in Shopify’s standard product categories. A product can have only one custom product type. To learn more, refer to Product Types.
- Vendor – The manufacturer, wholesaler, or other vendor for the product. You can filter your product list by vendor, which can speed up ordering inventory.
- Collections – The collections that a product is included in. You can use this field to add the product directly to a manual collection. Automated collections include the product when it matches the collection conditions.
- Tags – Tags are searchable keywords that you can associate with your product. Tags can help customers find your product through your online store search, and you can also use them to create automated collections. For more information about tags, refer to Tag formats.
When I was setting up my first store, I explored using subcollections (and watched Ed Code’s walkthrough), but ultimately decided that tags were more flexible for my needs. Tags let me build smart automated collections and gave me room to grow the product catalog without constantly tweaking my setup.
Sync your Google Analytics – Shopify and WordPress
In case you’re running into this, here’s a resource for tracking across your Blog and Shop on different domains..
Resources
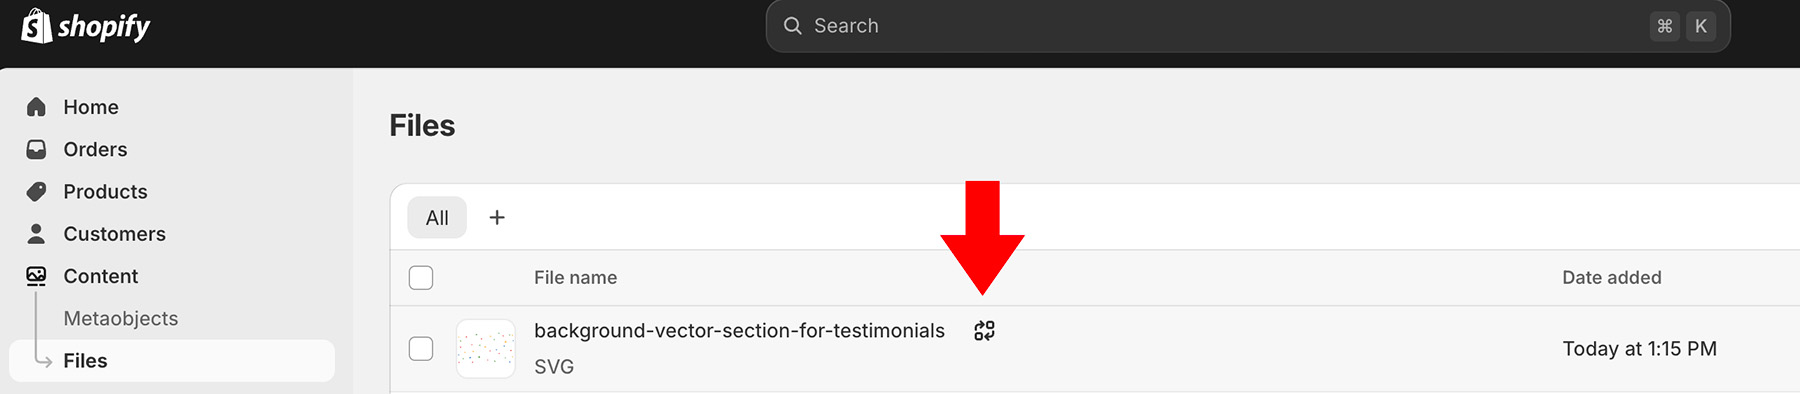
Know how to replace an image
If you’re looking for a feature similar to Replace an Image in WordPress’s Media Manager, the equivalent is Shopify > Content > Files. Then hover over the image name and you’ll see the Replace Icon. Click Replace and choose your file. This allows you to update an image without losing all the connections the image has throughout your store and theme.
Ensure your shipping is set up correctly
Make sure you test that your Shipping settings are fully configured.
I ran into an issue where I only selected one shipping method and this shipping method wasn’t available to many customer addresses. Those customers saw the error, “Shipping not available Your order cannot be shipped to the selected address. Review your address to ensure it’s correct and try again, or select a different address.”
What’s Missing?
How do I edit CSS in my default theme?
There are many ways to do this, here’s a resource that shows some of the ways.
Creating your Custom.JS and Custom.CSS in Shopify
I created two new files, custom.js and custom.css in my Shopify theme files. I linked to them in the theme.liquid file with this snippet of code:
 {{ 'custom.css' | asset_url | stylesheet_tag }}
  <script src="{{ 'custom.js' | asset_url }}" defer="defer"></script>
Add a CSS Class to a block
I expected to be able to ID or add classes to blocks by default. However, this is not currently a feature in Shopify themes (Spring 2024). There are workarounds that if you are a developer, designer, or coder, I absolutely recommend.
If you want to add a custom class to a block in your theme, you’ll need to add a text box to your schema and then use that block’s id in your HTML.
 {
    "type": "text",
    "id": "section_css_class",
    "label": "Section CSS Class",
    "default": "Type your own CSS class"
  },

Then use this in your HTML to display the css class
{{ section.settings.section_css_class }}
References: How to Add CSS Class to a Section in Shopify ✅ Shopify Theme Customization and Adding CSS blog post
In the Dawn theme, what class can I use to make a new section contained rather than full-width?
The dawn theme uses the class="page-width" to contain a <div> or <section>. You can use this “page-width” CSS class in your custom code to create a contained rather than full width new <div> or <section>.
<div class="page-width"></div>Customizations you may want to make to your theme
How to Create Custom Fields in Shopify
For my custom code, I went to my theme’s files, Snippets > buy-buttons.liquid and placed the following code directly above the <div class="product-form__buttons"> line:
{% if product.title == "title-of-product" %}
<label for="personalization" class="form__label">Personalization</label>
<input type="text" id="personalization" name="properties[Personalization]" required="required">
{% endif %}
Note that I want this field to be required, so the input includes and I updated another line of code in this same buy-buttons.liquid file; this is around line 47 in my theme. Delete the novalidate: 'novalidate' line of code.
.{%- form 'product',
product,
id: product_form_id,
class: 'form',
data-type: 'add-to-cart-form'
-%}
You’ll need to add CSS for styling this new field, too.
Other optional tweaks:
- Make this field duplicate based on the quantity purchased.
- To generate liquid code, here’s a free snippet creator: https://amineammari.com/field-generator-for-shopify-product-pages/
- We use it as a starting point to populate the “custom liquid” block in the product customization theme.
Many apps can help simplify this process too:
- Easify Product Options – highest ranking, made for Shopify – Paid
- Mini Customization Fields
- Excellent Free Generator for the creation of Custom Fields: https://websensepro.com/shopify-ui-elements-generator-free/
Resources:
Add Shopify Custom Field in Cart Video and Tutorial by KlinkKode
https://amineammari.com/blog/how-to-add-a-custom-field-to-a-shopify-product-page
Adding personalization fields in product details
{% if product.title == 'Custom Name Sticker' %}
<style>.custom.form__label{margin-bottom: 0.6rem}.field.custom{margin-top:0}.custom .field__input{padding-top:0.8rem}</style>
<label class="form__label-text custom" for="personalization">Personalization</label>
<div class="field custom">
    <input class="field__input" form="{{ 'product-form-' | append: section.id }}" type="text" id="personalization" name="properties[Personalization]" required>
    <script>
    document.addEventListener("DOMContentLoaded", ()=>{document.querySelector("form[novalidate]").removeAttribute("novalidate")})
    </script>
</div>
        {% endif %}
<!-- Use this snippet for conditional Custom Liquid blocks in your theme.
{% if product.title == 'Your Title' %}
{% endif %}Adding Custom Liquid to display discounts and deals per product
This YouTube video explains how to display discounts and deals based on product.
Stylizing my Color Variants to Show Color Swatches
In May of 2024, the default Shopify color swatches were not yet fully released. Shop owners were required to request early access. So, I’m looking forward to the feature being part of Shopify theme’s by default, but for now, I implemented the code provided by WebSensePro on my Origin theme shop.
Adding YouTube Videos to my Shopify Site
There are many ways to add YouTube Videos to your Shopify Site. I’ve recorded a video demoing three ways to do it:
- the WYSIWYG page content;
- using metadata; and
- adding video to the product gallery.
Add YouTube videos using Metafields in Shopify
One way is to use metafields.
2025 Update: The “Content Data” field in Settings (shown in video above) is now called “Metafields and Metabobjects.”
I created a metafield called product.metafields.custom.embed_youtube_video. I pasted the embed link from YouTube into that metafield for some products. Then, I created a conditional liquid block on the product template and included the code below.
The code reads like this: if the metafield product.metafields.custom.embed_youtube_video is not blank, then run this code.
{% if product.metafields.custom.embed_youtube_video != blank %}
<iframe width="560" height="315" src="{{product.metafields.custom.embed_youtube_video}}" title="YouTube video player" frameborder="0" allow="accelerometer; autoplay; clipboard-write; encrypted-media; gyroscope; picture-in-picture; web-share" referrerpolicy="strict-origin-when-cross-origin" allowfullscreen></iframe>
{% endif %}
Tip: Use Embed Responsively’s website to copy and paste responsive YouTube embed code. You may want to add a CSS declaration that hides any liquid block sections not intended to be viewed, for instance, because its conditional statement is false.
Additional Resources:
- Tutorial with pictures to show how to add YouTube videos using the WYSIWYG in product description blocks.
Examples of syntax for using metadata in Shopify to display images and text
<img style="display: block; margin-left: auto; margin-right: auto; width: auto; max-width: 100%;" src={{product.metafields.custom.imagem_problema_solu_o | img_url: '800x'}}>

Found here
Adding a custom coded section to my Shopify theme
Tip: Working on .liquid you’ll be working in json schema. It’s easy to make a mistake in your syntax and to receive the error “Unable to update the file. Invalid JSON in tag ‘schema.” To trouble shoot your JSON syntax, try using this JSON Validator: https://jsonlint.com/
Commas can be tricky. In settings and presets, make sure each line ends in a comma, except the last one.
The dev docs Shopify resource was extremely useful in finding what inputs I could add to a section or block.
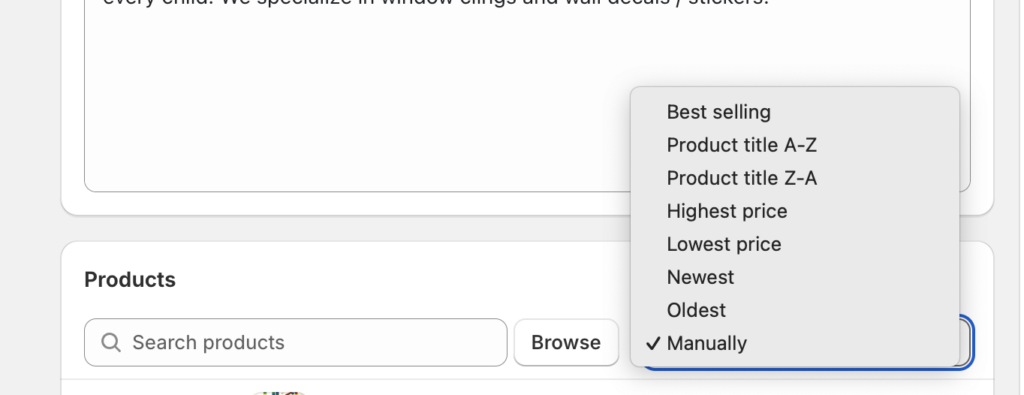
Change the order that your Products are displayed in the Product Grid
You can change your product’s display order in the Product Grid by logging into your Admin and selecting Products > Collections. Then choose how you want your products sorted. If you choose “Manual” for sorting, then you can drag and drop your products into the order you prefer.
Naming new sections in Shopify
There are two important areas you want to name a new section. One is displayed when you select Add Section, and the other is the name displayed when shown in the left column.
Adding Pinterest Pins to my Dawn Theme using the Multicolumn template
My goal was to create columns where I could add images and existing pins to my product pages. To accomplish this I used the Shopify Dawn theme’s multicolumn.liquid section as a starting point. I created a new section called pinterestcolumn.liquid.
I added a few customizations to my new file. I named this new section Pinterest by changing the schema name to “Pinterest” from “Multicolumn.”
{% schema %}
{
  "name": "Pinterest",
  "class": "section",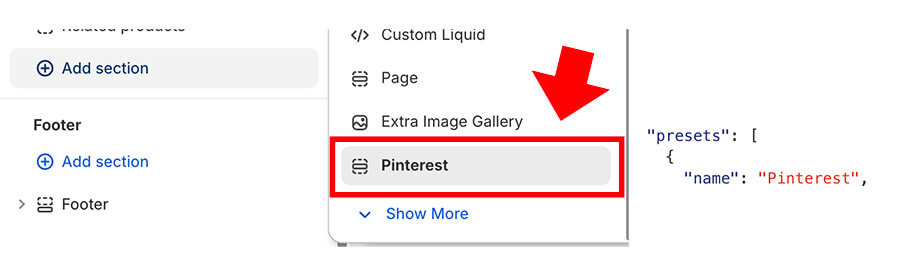
I made this new Pinterest block display conditionally by wrapping the content in a conditional way that checks if the product has either the first image pin I created in the metafields or the HTML metafield intended for an embedded Pinterest pin.
{% if product.metafields.custom.pin_1 or product.metafields.custom.html_field_in_pin_column_gallery != blank  %}
<!-- all content -->
 {% endif %}
<!-- schema starts -->
{% schema %}
I added a few new CSS styles to make the embedded Pinterest pins responsive and centered in my layout. I also wrapped the Pinterest iframe with <div id="pinterest-container">.
<style>
/* Makes pinterest iframes responsive and centered in my multicolumn pin block */
#pinterest-container {
display: flex;
justify-content: center;
width:100%;
}
/* Makes pinterest iframes responsive and centered in my multicolumn pin block */
#pinterest-container a {
    flex: 1;
}

/* Optional - Adjusts right margin in Pinterest block when in mobile view. Can paste into HTML metafield.*/
@media screen and (max-width: 749px) {
    .grid--peek.slider .grid__item:first-of-type {
        margin-right: 1.5rem;
}</style>

<div id="pinterest-container"><iframe src="https://assets.pinterest.com/ext/embed.html?id=604608318717322870" height="1000" width="600" frameborder="0" scrolling="no"></iframe>
</div>
Troubleshooting: I did not run into my single-line text input metafield that did not render the HTML, but I found forums where users ran into this issue on single-line and multi-line text options. Here’s a forum link that discusses the issue. A workaround is appending .value to the end of your metafield name. Example below:
{{ product.metafields.my_fields.assembly_manual.value }}I also found lots of resources for customizing multicolumn, here are a few others: Video about Swipe/Slide addition.
Customize Checkout with Additional Questions
If you want to customize your checkout area, this resource for “How to add personalization text boxes” in the Shopify Forum is worth checking out.
Also, this online tool, Shopify UI Elements Generator, is an online generator for code for V2 checkout questions: https://ui-elements-generator.myshopify.com/pages/cart-attribute
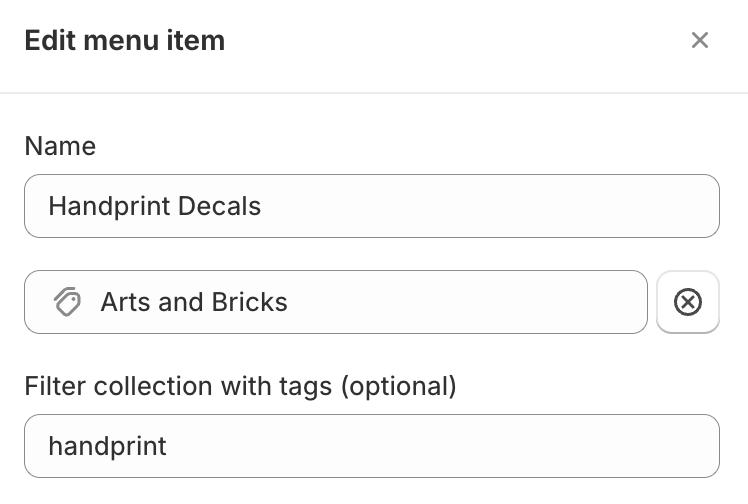
Customizing the navigation
I used the Collections option in the menu to create drop-down options filtered by product tags.
Stylizing your theme section dividers
Additional resources: Shape Dividers by WebSensePro
Add Gallery to Dawn Theme
I used this blogger’s code as a reference: https://marcoswatanabe.com/shopify-guides/image-gallery-shopify-dawn
The blog links to a GitHub repo with the code you can copy and paste into a new file that you create and name image-gallery.liquid in Sections.
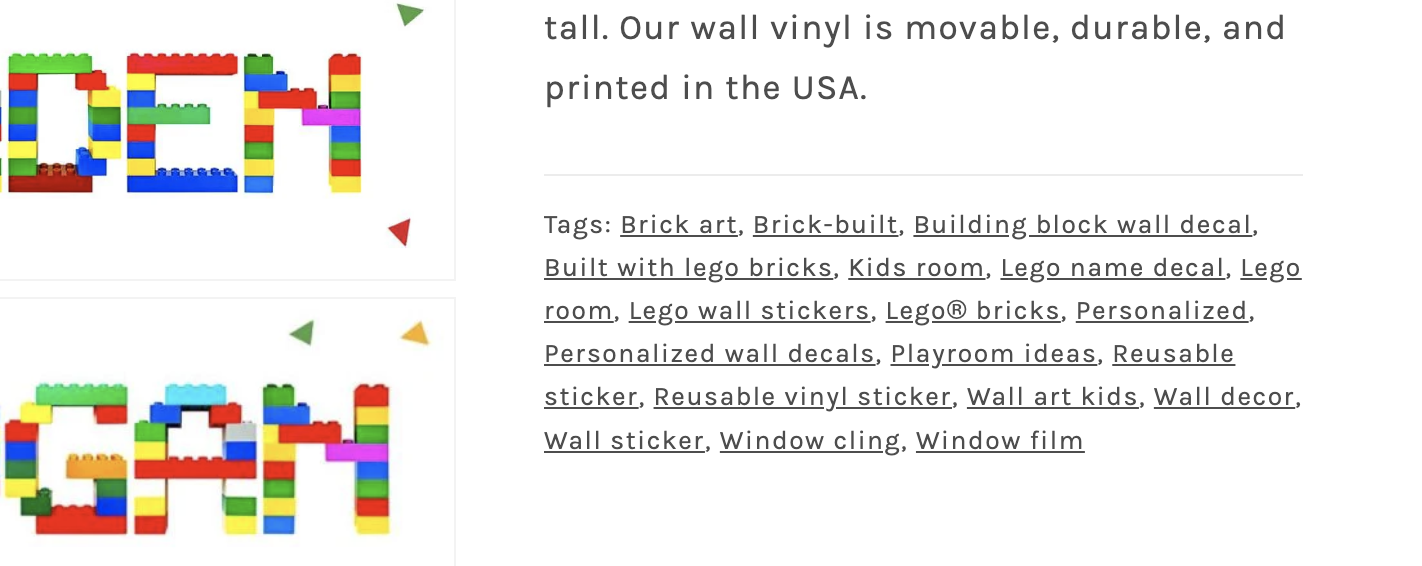
URL Patterns for my Shopify Products, Tags and Collections
https://mywebsite.com/collections/collectionname/tag
Useful Code Snippets
Example of looping through array of images in Shopify metadata
Product Tags
Snippets of code you can use or adapt
 {% for tag in product.tags %}
 {% if tag == 'HOT' %}
 This is a hot product, you do not want to miss out on this one!
 {% endfor %}
 {% endif %}
Display Product Tag on Collection Page
<!-- Get the tags the current page is filtered by and save to a string.
"{%-" and "-%}" is to remove unwanted whitespace.
-->
{%- capture tags_for_url -%}
  {%- for tag in current_tags -%}
    {{- tag -}}{%- unless forloop.last %}+{% endunless -%}
  {%- endfor -%}
{%- endcapture -%}

<!--Display the tags-->
<p>{{ tags_for_url }} </p>
In main-collection-banner.liquid
<h1 class="collection-hero__title">
<span class="visually-hidden">{{ 'sections.collection_template.title' | t }}: </span>
{% if current_tags == blank %}
{{- collection.title | escape -}}
{%- else -%}
{%- capture tags_for_url -%}
{%- for tag in current_tags -%}
{{- tag -}}{%- unless forloop.last %}+{% endunless -%}
{%- endfor -%}
{%- endcapture -%}
{{ tags_for_url | capitalize }} Decals from {{ collection.title | escape }}
{%- endif -%}
</h1>
{%- if section.settings.show_collection_description -%}
<div class="collection-hero__description rte">{{ collection.description }}</div>
{%- endif -%}
</div>Reference for String of Tags: https://community.shopify.com/c/shopify-discussions/sort-products-on-tag-pages-collection-page-product-tag/m-p/1077791
When statements
I used this snippet of code in my main-product.liquid file in the Dawn theme. You can learn more about when statements here.
{%- when 'html_content' -%}
<div class="product-text">
{{ block.settings.html_area }}
</div>
I wanted to add an option in the theme to add an HTML block in the product description area. This Shopify discussion helped me figure that out.
Add Buy Now – product snippet to any other website
Shopify developed a FREE install that allows you to add a collections or by product embed code to shop and check-out from your Shopify store on external websites. This is a perfect way to integrate your Shopify store with your WordPress, SquareSpace, or Wix websites and blogs.
Instructions for turning on the Buy Button Shopify Sales channel are on the Shopify Forum.
Watch this video of how I implement Shopify Buy Now Buttons on my WordPress Blog
Using Vanilla Javascript to ensure all my external links open in new tabs
You can add custom JavaScript through the Shopify Script Editor
- Go to your Shopify admin
- Navigate to “Online Store” > “Themes” > “Customize” button
- Click the “Actions” dropdown and choose “Edit code.”
- In the “Assets” folder, create a new JavaScript file (e.g., custom.js) and add your code there.
let anchorLinks = document.querySelectorAll("a");

for (let i = 0; i < anchorLinks.length; i += 1) {
  if (anchorLinks[i].host !== window.location.hostname) {
    anchorLinks[i].setAttribute("target", "_blank");
  }
}
Additional resource: https://w3things.com/blog/open-external-links-in-new-tab-javascript/
Add a tag cloud to your product page template
In older templates, place this code in Sections / product-template.liquid. In V2.0 templates, such as Dawn, put this code in .main-product.liquid. I placed the code directly after the {%- when 'description' -%} block. For additional styling, I used the class “caption” from the Dawn theme, which makes the text smaller. I also created a new border-top CSS class.
{% if product.tags.size > 0 %}
                  <div class="product-single__tags border-top">
                    <p class="caption">
                      Product Tags:
                      {% for tag in product.tags %}
                        {% assign tag_coll = '/collections/all/' | append: tag %}
                        {{ tag | capitalize | link_to: tag_coll -}}
                        {%- unless forloop.last %},{% endunless %}
                      {% endfor %}
                    </p>
                  </div>
                {%- endif -%}
NEW CUSTOM CSS I added:
.product-single__tags .caption a {
color: rgb(var(--gradient-background));
}
.border-top {
border-top: 1px solid #ececec;
}
Additional References: Shopify Forum
How to remove Shipping Calculated at Checkout in Shopify on Dawn Theme
In the Dawn theme, you can edit the main-product.liquid code to hide the “Shipping calculated at checkout” text and/or the “Taxes included” text.
I demonstrate one way to do this in the video below. Alternatively, you can make changes without touching your code files from the Online Store > Theme > Actions > Edit Theme Language area. You can search for “Tax included” and “Shipping” and then change the verbiage or delete it completely from these fields. Here’s a link to a Shopify forum resource for that technique.
Moving from Woocommerce to Shopify
Additional Resources I found helpful moving and configuring my Woocommerce store over to Shopify
When I deleted WooCommerce from my WordPress blog, I was then able to deactivate ELEVEN specific WooCommerce Plugins. Each of these plugins’ features is built-in to my Shopify site.
301 Redirects from Woocommerce to Shopify
I used two Regex redirects to bulk redirect my product tags and product listings from my Woocommerce store to my new Shopify domain.
RedirectMatch Directives
In this expression, the (.+) matches the changing part in the source URL. Adding the parenthesis makes the changing part in the source URL a “capture group.” The (.+) will match any number of any characters, so it should catch all the old links. The second part of the redirect uses $1. The $1 token will match whatever is in the capture group in the old URLs, so the $1 to adds the matched part to the new redirected URL.
https://artsandbricks.com/product/(.+)

redirects to

https://store.barkhurstcreative.com/products/$1https://artsandbricks.com/product-tag/(.+)
redirects to
https://store.barkhurstcreative.com/collections/arts-and-bricks/$1Although these Regex redirects caught many of the needed redirects, I still tested each product tag and product individually. When a 404 occurred, I created an individual 301 redirect. The reason I had to create some individual redirects is that after the move I changed the naming of the product and also the slug’s naming or I changed the product tag’s naming convention.
I also deleted and created redirects for pages like https://artsandbricks.com/checkout and https://artsandbricks.com/shop.
Video of testing and adding redirect in WordPress using Smart Crawl Wizard
Here are some examples you can test.
https://artsandbricks.com/product/brick-built-name-sticker/
will redirect to
https://store.barkhurstcreative.com/products/custom-name-sticker

*Required an individual 301 redirect because slugs are different.
https://artsandbricks.com/product/brick-built-navy-ship/
will redirect to
https://store.barkhurstcreative.com/products/brick-built-navy-ship/
*Slug is the same so Regex redirect worksUpdate former Woocommerce Menu items with Shopify Custom Links
When you remove Woocommerce from WordPress, you’ll likely have pages linked in your WordPress menus, too. Here’s a video of how I cleaned up my Menus and swapped out the Woocommerce pages (now deleted) with new active Shopify custom links in the menu.
My favorite features of Shopify stores
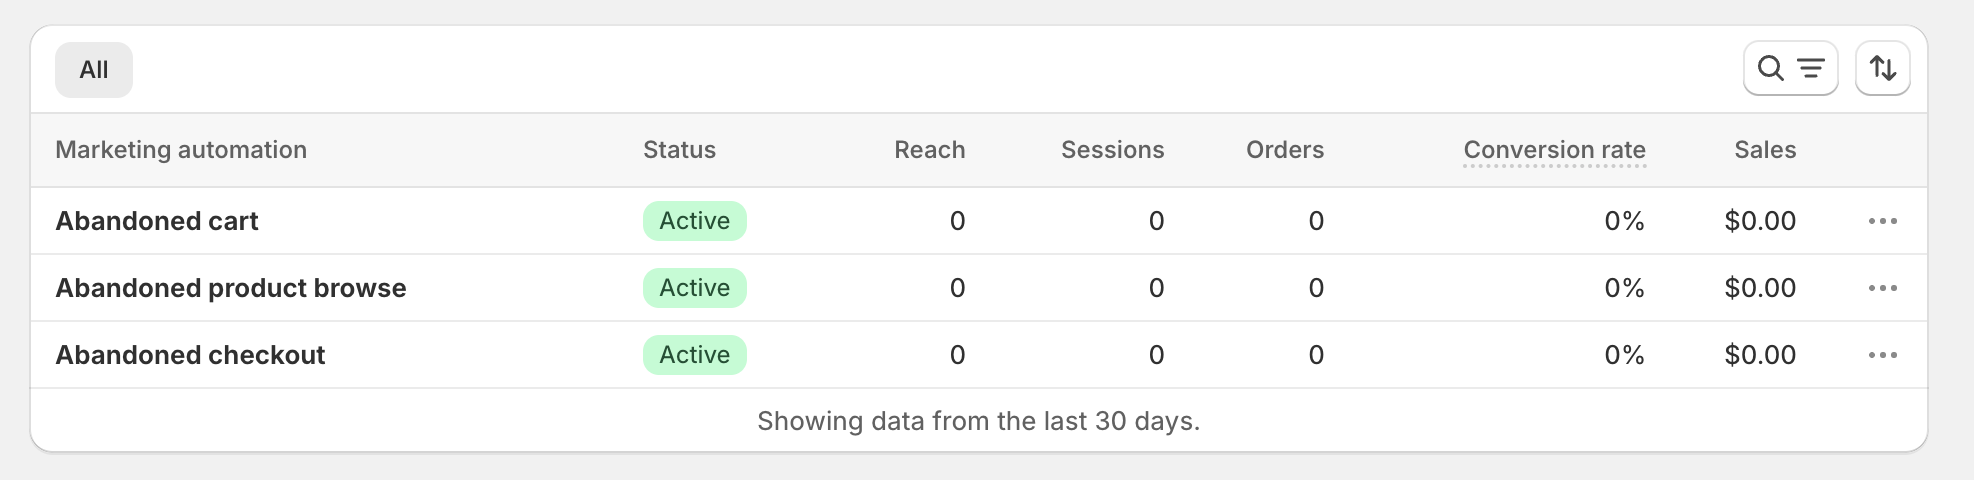
One-click remarketing automation
One-click free remarketing automation?!? Yes, please! Automation options include abandoned cart, abandoned product browse, and abandoned checkout. Learn more about Shopify Marketing automation.
Translate and Adapt for International Markets – For Free
Again, this feature is easy to turn on, and the software automatically translates your shop for international markets.
The Product Filtering Options and Styling are Built-In
Your product filtering options are built-in to the Product Grid block. You can easily add filtering and sorting (no extra plugins required) and even change the layout from vertical to horizontal to drawer with just a selection.

Easy to Add Cookie Banner
You can meet site requirements by opting to turn on a cookie banner. There is no need to use a third-party service or plugin.