
When I build infographics in Wix Studio, I often create all the elements in Adobe Illustrator and export them as SVGs. I give them black fills in Illustrator on purpose. This way, when I upload them to Wix Studio as shapes or vector images, I can recolor them there. Recoloring can be changed one-by-one in the WixStudio editor, or, to my preference, I can recolor the entire infographic at once using CSS.
This all-at-once CSS approach should work beautifully in most website builders, but Wix Studio introduces one important complication. During the build and publish process, Wix Studio automatically generates a large number of internal classes with names like .JGtLUp, .xuzjBY, or .Vq6kJx. These class names are not meaningful, not documented, and not stable. They exist purely for Wix’s rendering engine and can change at any time, even between republishings of the same page.
Because of this, relying on element IDs or these auto-generated classes is unreliable. The ID you see while editing may not match the ID that appears in the published code, and any class that looks like random letters is intentionally not designed for developers to target.
A more stable, future-proof approach is to add your own class at the <section> level and then style all elements inside that section. This approach allows you to bypass the shifting IDs and focus on a predictable CSS structure. Even with this strategy, though, Wix Studio still wraps elements in deeply nested components with strong default styling, which can require using more specific selectors — and occasionally !important — to fully override the colors.
In this post, I will show how I recolored every element inside a section, including text, headings, SVGs, vector images, and divider lines, using a single CSS class. I will also show how to use Wix Studio color palette variables so your colors adapt automatically when your site colors change.
Assign a Custom Class to Your Section
First, select the section containing your infographic (choose from the Layers panel on the left) and add a class. Add a custom class by opening the code panel from the bottom and selecting the CSS Classes tab. In the custom classes field, type in the name of your new class.
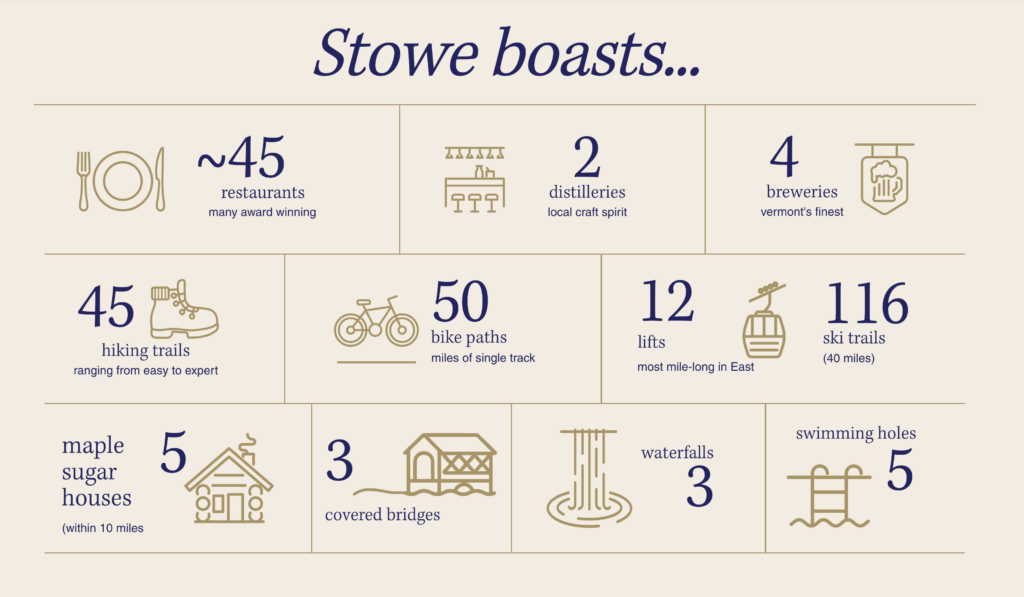
In this case, I added bluetext custom CSS to each of the sections labeled: #row1, #row2, and #row3, too. The remaining examples will use bluetext as the custom class; substitute this custom naming for what makes sense in your design and code.
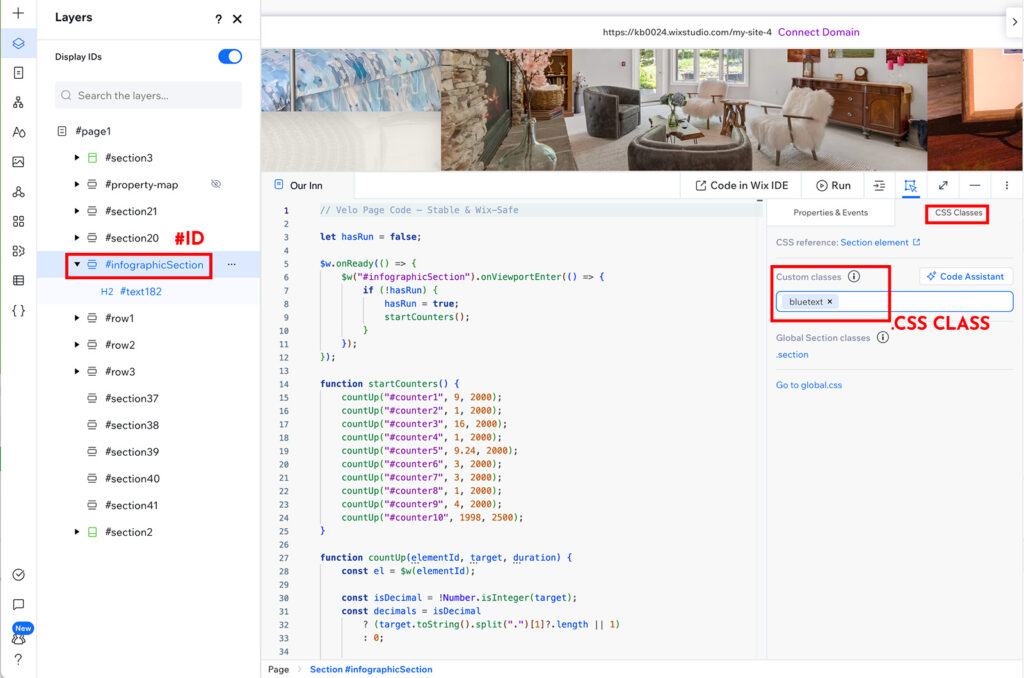
The class you create allows you to select your <section> and recolor elements.
Use Wix Studio Color Variables
WixStudio lets your site use a theme color palette, and each color in this palette has a variable that you can use in custom CSS.
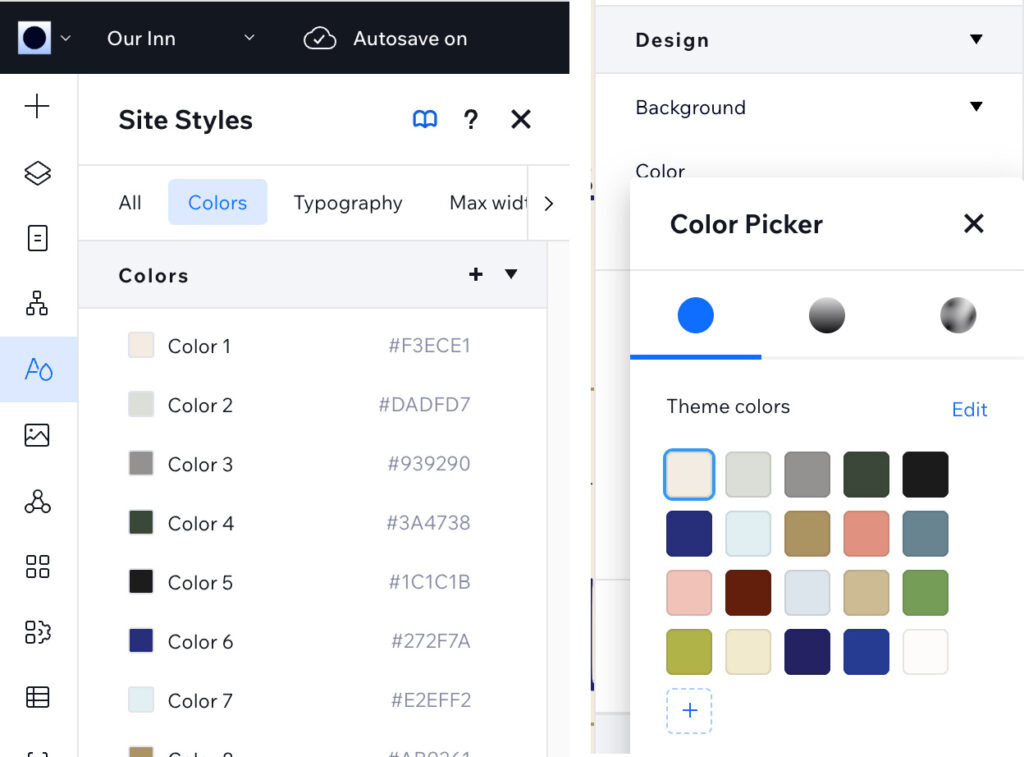
Wix Studio exposes your site theme color palette as CSS variables like this:
--color_25: 0, 75, 201
To use this color in CSS, wrap it in an rgba function:
rgba(var(--color_25), 1)
Using palette variables instead of hard-coded hex values ensures your colors update automatically if you change your theme.
Recolor Text, Headings, and SVGs
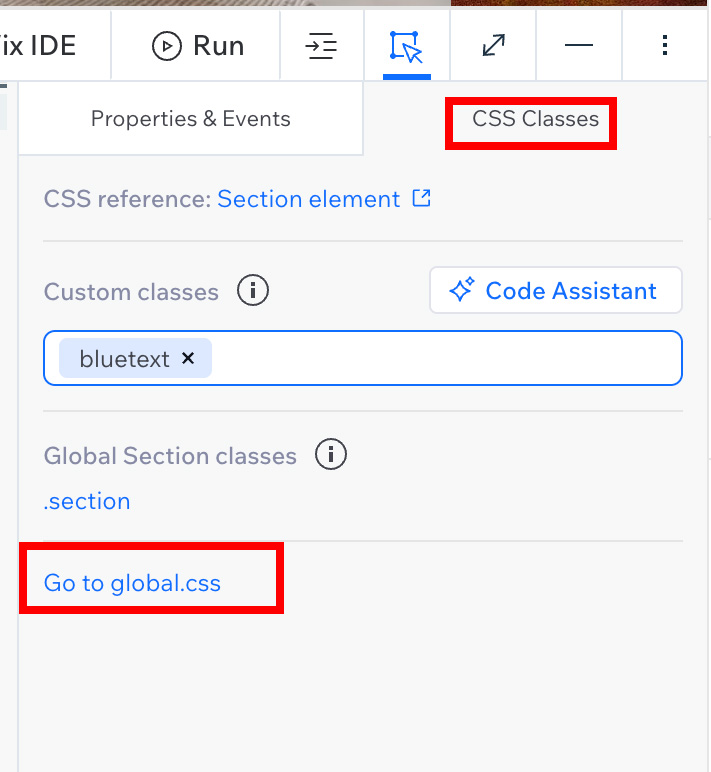
Next, open your Global.css file. You can access this file by clicking the link that reads,”Go to global.css“This file is where you will add your CSS declarations.
Wix Studio applies strong default styles to text, rich text elements, and SVGs. To override all of them, target the section and all its children. Instead of using the section id, the CSS that works is to use the generic element section and then the class we added, in this case, bluetext:
section.bluetext,
section.bluetext * {
  color: rgba(var(--color_25), 1) !important;
  fill: rgba(var(--color_25), 1) !important;
  stroke: rgba(var(--color_25), 1) !important;
}

/* RICH TEXT */
section.bluetext .wixui-rich-text__text {
  color: rgba(var(--color_25), 1) !important;
}
The CSS above recolors the text and SVG icons in my infographic section because of the use of * (universal selector and wildcard), including:
- Paragraphs and headings
- Links and buttons
- SVG fills and strokes
- Vector images imported from Illustrator
Because the SVG icons I uploaded have a black fill by default, this CSS recolors them.
Make Sure Vector Images Respond
To explicitly color the SVG icons, I can use more specific CSS, especially since some vector images contain nested elements or paths that require explicit targeting. Add this CSS to ensure every part recolors. In my case, I’m using color_26 so the icons are gold.
/* SVGs + vector images */
section.bluetext .wixui-vector-image svg *,
section.bluetext svg *,
section.bluetext [data-testid="svgRoot"],
section.bluetext [data-testid="svgRoot"] * {
  fill: rgba(var(--color_26), 1) !important;
  stroke: rgba(var(--color_26), 1) !important;
}
The above CSS covers all SVGs, including grouped paths and masked elements.
If you’re working with SVG icons in Wix Studio and want them to behave consistently — including how they’re sized and styled — see my SVG icons + repeater guide: Mastering SVG Icons and Repeaters in Wix Studio
Recolor Divider Lines
Divider lines in Wix Studio can render in multiple ways: as borders, small rotated divs, or line elements. Finally, to recolor horizontal and vertical lines, use:
/* Divider lines inside any .bluetext section */
section.bluetext .wixui-horizontal-line,
section.bluetext .wixui-horizontal-line *,
section.bluetext [class*="horizontal-line"],
section.bluetext [class*="vertical-line"] {
  border-color: rgba(var(--color_26), 1) !important;
  background-color: rgba(var(--color_26), 1) !important;
}
The provided CSS above ensures that all lines in my infographic section match the site-wide color palette, even if they change in the future.
Why This CSS Method Works
By giving my infographic section a class and targeting all child elements, I avoid relying on IDs that Wix Studio changes automatically. My SVGs from Illustrator stay fully controllable. All text, headings, and lines adopt the color I choose, and the color can update automatically if I change my site palette.
This approach is perfect for infographics, icon-heavy sections, and other visual content where you want to recolor and perhaps even test colors consistently. This method eliminates the need to select each element in the section one by one, then use the UI to choose the fill or outline color.
Watch Video Overview
Further Wix Studio Resources
If you’re new to Wix Studio or curious what it’s like to design in this environment, check out my first impressions and workflow tips from when I started using Wix Studio as a web and graphic designer: First Impressions Using Wix Studio as a Web & Graphic Designer
For another foundational layout tip in Wix Studio — specifically how to set and use max width on content sections — check out my guide to setting a max width in Wix Studio: How to Set a Max Width in Wix Studio (And Why You’ll Actually Want To)
For dynamic pages in Wix Studio, I also have a guide on customizing breadcrumbs beyond the default (Item) label — handy if you’re building CMS-driven content layouts: Customize Breadcrumbs for Dynamic Pages in Wix Studio