Serving Auto-Placed Google Ads? Make sure you’ve added this…

S

We’ve all been there. We’re on a blog, trying to read an article or make a recipe and we’re bombarded with Google Ads that are hardly separated from the content. Yikes!

What can a website owner do?

Well, if your website serves Google Auto-Placed Ads, you should consider adding custom CSS to help tame the look and feel of the advertisements displayed on your site.

CSS for Google Ads (Google AdSense)

When Google auto-places an advertisement on your web property, the ad is served inside a <div> container with the class google-auto-placed. This means you can use CSS on the content that Google places automatically on your website.

So, what CSS do I want to add to my Google AdSense advertisements?

Add a CSS “Advertisement” Label to Google Ads

A common desire is place the word ADVERTISEMENT either above or below the served advertisement. To do so, you’ll add a font size, font family and font style to the main class and then use either ::before or ::after to place that text above or below your advertisement.

/*Places the word ADVERTISEMENT ABOVE served ads and styles text*/
.google-auto-placed::before {
   content: 'Advertisement';
    position: relative;
    text-transform: uppercase;
    color: #bbb;
    font-size: .85rem;
}

or

/*Places the word ADVERTISEMENT BELOW served ads*/
.google-auto-placed::after {
content: "Advertisement";
}

and

Add a CSS Border Around your Auto-Placed Google Ads

/*Forces a thin border */
.google-auto-placed iframe {
    border: 1px solid #efefef !important;
}

Watch a Video about How to Add the word “Advertisement” Before or After Your Google Ads
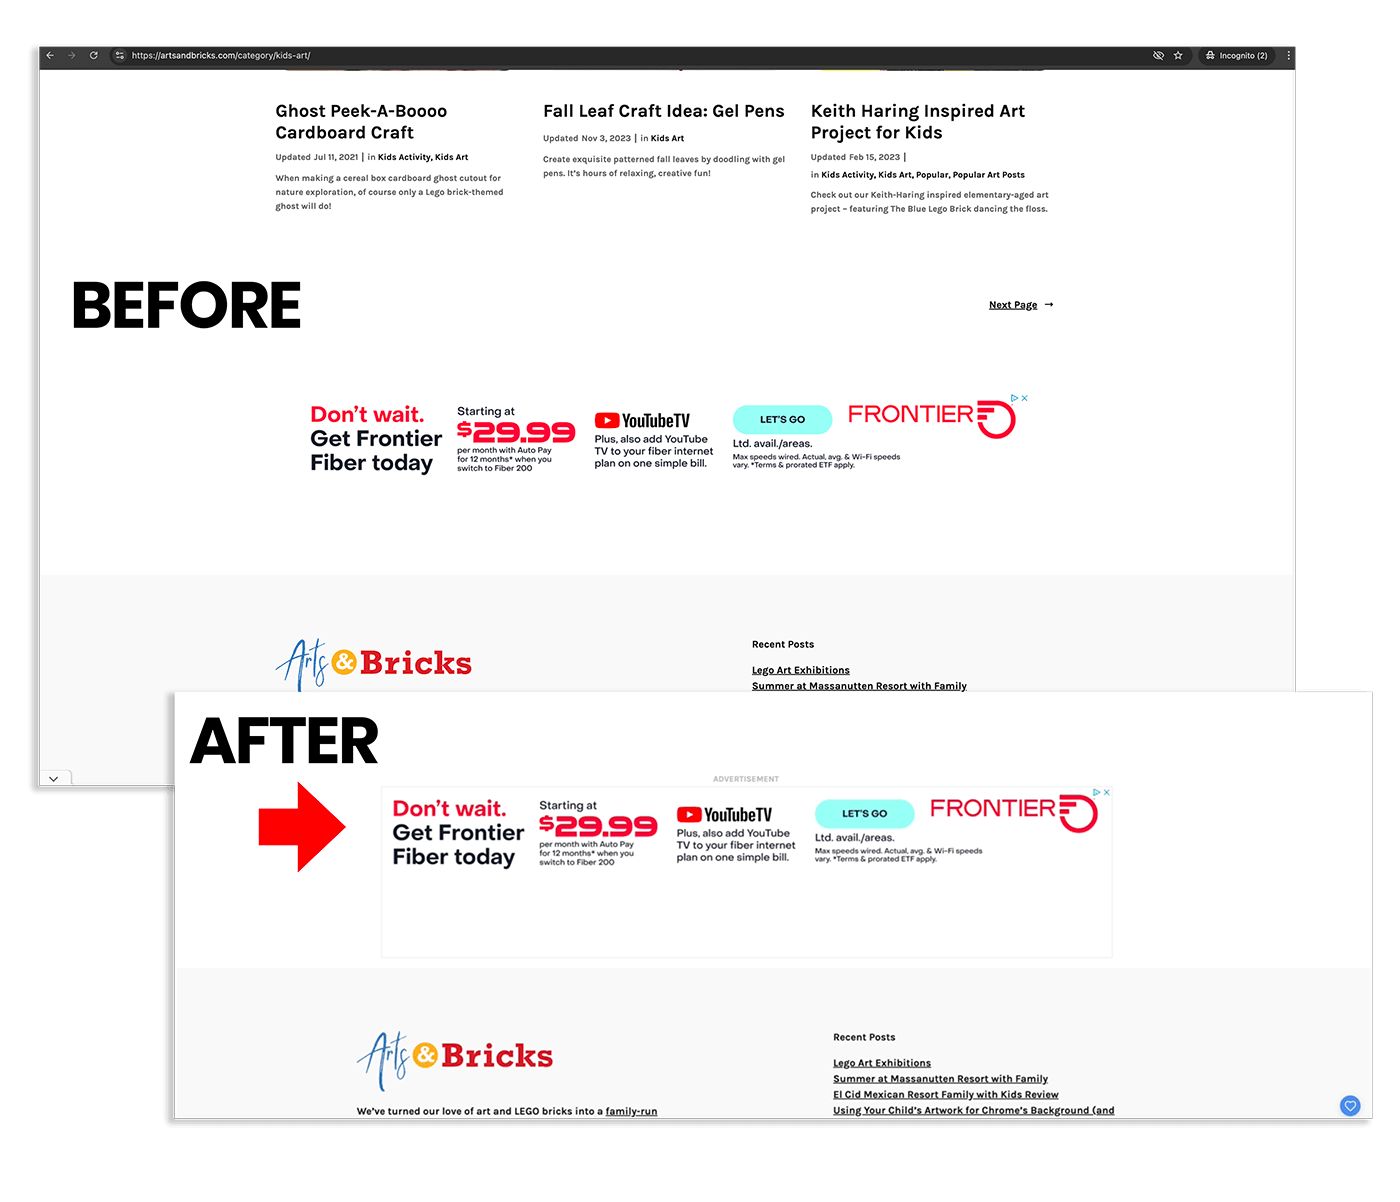
Hi. So if you have a website where you

are serving Google ads, then you probably want to do this.

Have you ever looked and seen that one of these auto-placed ads has

no boundary? It just bleeds right into your content.

So this is a Frontier banner ad here.

And it has no border.

As a designer, I hate that. Now,

most of the ads that are served by the auto-placement do

have a border, but it is not required.

One thing that you might want to do on your website to

better separate your content from your advertising is to create a border

and add the words, “Advertisement.”

Right, so if you’re looking for how do I write “Advertisement” before an auto-served

ad with Google Ads,

or how do I force a border around my auto-placed Google Ads,

then you’ve come to the right place. So I’m going to demo on the

artsandbricks.com blog, and it is a WordPress blog,

so I’m going to be using CSS,

in the block editor for Gutenberg,

but this same CSS can be used on any website that is

serving the auto-placed ads. So don’t feel like this is restrictive

if your site isn’t WordPress,

or if you’re using a different type of theme.

The goal is that you find where you put your CSS,

and it will capture

the auto-placed ads, and define your styles.

Alright. So what we’re looking at is Google-Auto-Placed.

That is the class that’s added to the div when that auto-placed ad

is put onto your website from Google. And,

we are looking at

the pseudo-class before.

So before the div, we can add the word advertisement.

And, if you want it to go above this div,

you can add a position relative and top.

Whatever’s a good fit for you. If you like your words to be uppercase,

then you can do a text transform. If you know what color you want

your word advertisement to be, you could do that. And again,

you can choose your font size. So any of that kind of styling for

the word advertisement, you can use here.

And then, if we look at the code inside this div with

the class Google AutoPlaced, the I frame is going to be

what the actual advertisement is.

So that is where you could force an add border,

um, or a shell.

So, I’m going to grab this code and show here we are before.

If I go ahead and come into Inspect,

I can click here.

We can see if we come up in the code.

That we have the div class Google auto placed.

So it is with a hundred percent. Within that,

I have the iFrame right here.

Alright, so if we go ahead and bring

in some of our text here.

If I type in iFrame, I can give it a border.

Alright, so that is already helping,

right? I have put a thin border.

Now I could change my border.

Um, so this is the iFrame.

So I have a- It is one pixel. I could say.

Three pixels. If I want it to be thick.

Um, two pixels. I could change the color.

You know, you can do 1.5 pixels.

So that is really kind of up to you what you want that to

look like. Alright.

So then I wanna add the word advertisement up above.

Okay, so I’m gonna go ahead and put Alright.

So now I’ve been able to put in this Google auto-placed pseudo-class before and

it adds my advertisement and,

In all uppercase, 10 pixels above,

umm, so that it sits above this border and,

umm, is smaller text and a light gray.

So to me, this helps me feel like the advertisement is now separated from

my content and really clear to users.

And this is something that does not affect these type of ads.

It’s only the one, that have div class,

uh, Google auto-placed, but it does affect this top one,

right? So I’ve added advertisement and it has my border.

Um, so you can see this one actually had a border,

so this is giving it a little bit of an extra one,

which might be, um,

you know, one of the decisions that you would make for Google auto-placed.

Nice. All right. Yeah. Um, iframe,

you can see if we go here. I did 1.5

pixels. If I went to 1.0,

you know, that’s a little bit thinner. You can see if I turned this

off. That is what the ad had by default.

It had a thin border and I added a border.

So its border was rounded minus- square,

umm, which is why you can see it a little bit more.

Alright. Umm, so,

that’s how I picked what kinda styling I wanted

from Inspect. In this case,

uhh, because I am using Gutenberg,

I can come into my styles.

I can add them. And, here. And this would be globally,

umm, now apply to my site when I add this.

I’ll go ahead and save, save,

Alright, so if I come in and I, say empty cash and hard reload,

I will know that it’s working because all of my Google Play ads will

now say advertisement above it and that’s coming from my website’s CSS.

You can see this Frontier ad,

it has it as well. Now,

in this case, it doesn’t- seem like the text being

above it is quite enough. So,

perhaps changing, let’s see.

So that’s the before. If I just do top with

no pixels, it sits really nicely there.

Let’s see about here. Up there it does too.

So I think I’m just going to have- have no pixels.

Umm, so that would just be default and it will align better.

Alright, so to me, that is feeling a lot better to have

my advertisements have a border around them.

And it’s just one of the ways that I’m going to start cleaning up

the layout of my website when it is using-

Google ads auto-placed. Alright,

so I hope this helps you. The CSS is in the comments and also

on the blog.

Before and After

This CSS adds a subtle 1px border around the iframe of Auto Served Google Ads and the word, “Advertisement” above the box. This helps to create a visual separation of your website content from auto-served advertisements.

Before and After adding a border and the word "Advertisement" Above my Google Ads

Happy CSSing!

About the author

Kelly Barkhurst

Designer to Fullstack is my place to geek out and share tech solutions from my day-to-day as a graphic designer, programmer, and business owner (portfolio). I also write on Arts and Bricks, a parenting blog and decal shop that embraces my family’s love of Art and LEGO bricks!

Add comment

By Kelly Barkhurst

Recent Posts

Archives

Categories